S-5-S Standing Seam Clamp

Heavy Duty Clamp of Standing Seam Roofs

The S-5-S is a base-clamp used for mounting on standing seam roofs. For installation of Ice Dam Heat Tape, use along with our S-5 SR Clip.

  • Use on vertical snap-together profiles
  • Use on single-folded with horizontal projection ≤ 0.54” (13 mm)
  • Two T-30 Torx round-point setscrews (Torx bit tip provided)
  • One M8 bolt included

$9.50$239.95

FREE Shipping

Product Details

S-5-S Standing Seam Clamp

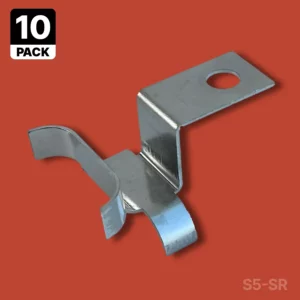
The S-5 is the preeminent solution for any mounting application on standing seam roofs. Combined with our S-5 SR Heat Tape Clip, ice dam heat tape can easily be mounted to your standing seam roof. Using the S-5 SR Clip your heat tape is re-positionable and doesn’t require any tools to loosen or alter the position of your heat tape.

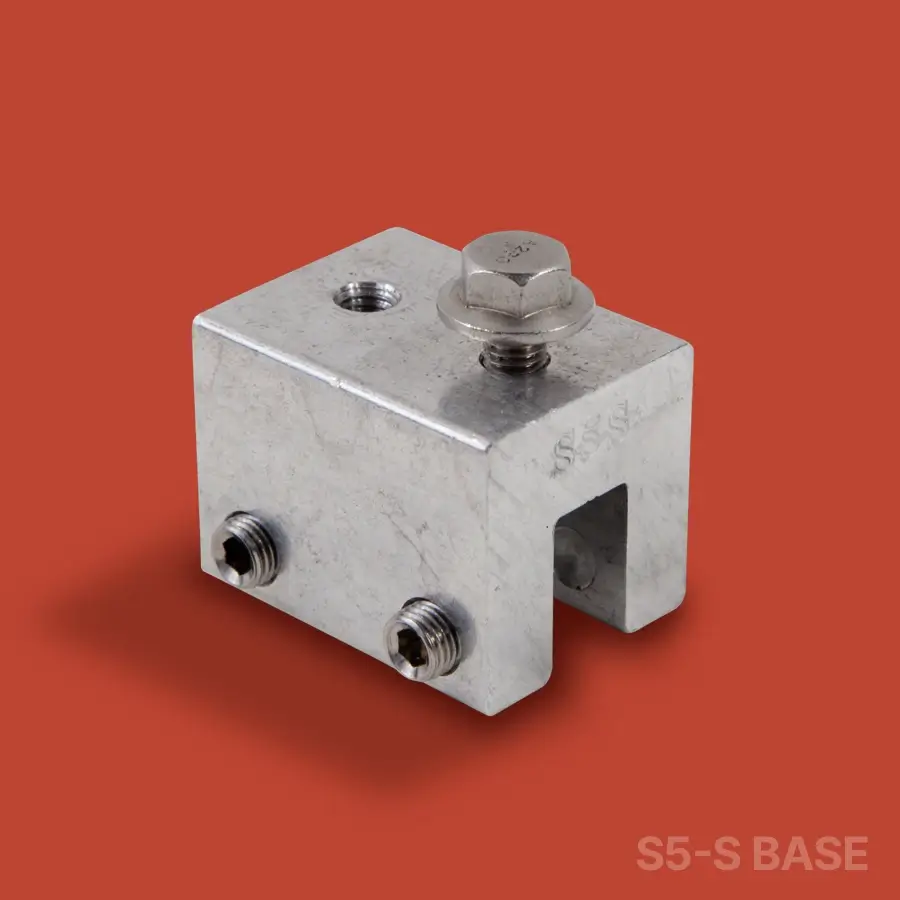
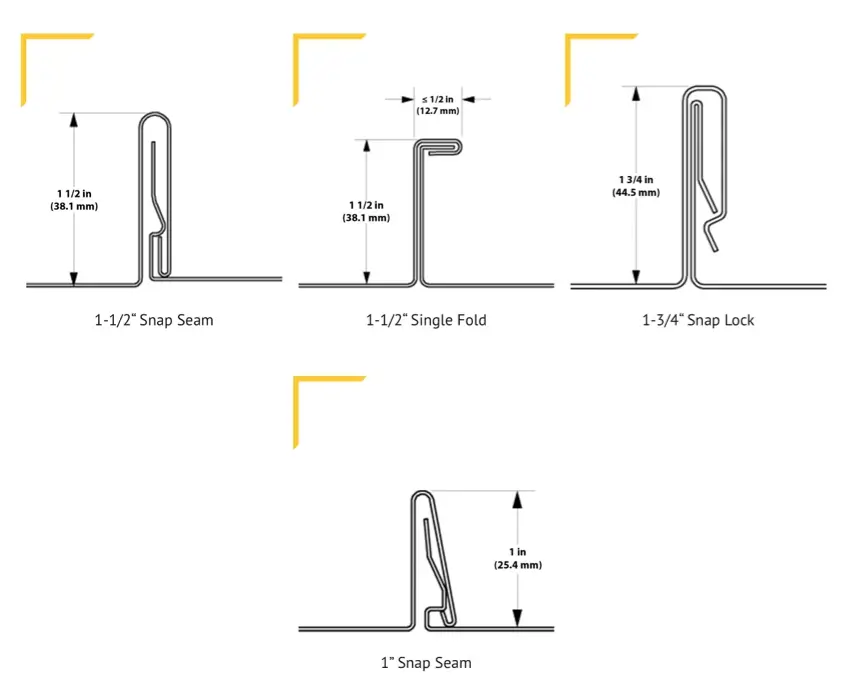
The S-5-S (“S” stands for snap-lock) is a non-penetrating, standing seam metal roof (SSMR) clamp. The S is designed for most popular vertical snap-together profiles — typically with vertical dimensions of 1.5” (38 mm) and 1.75” (44 mm).

The S is also the perfect solution for traditional, single-fold (angle-seam) horizontal profiles of 1” (25 mm) and 1.5” (38 mm) seam height dimensions and all similar seam types.

Does the S-5-S Fit Your Roof Profile?

In order for the S-5-S  to fit the types of seams illustrated below, the finished seam must:

  • Be at least 1” high
  • Have a finished seam thickness ≤.54” (13 mm) for snap-lock type profiles
  • Have a horizontal seam dimension ≤.54” (13 mm) for single-fold type profiles
  • Have a male seam height sufficient for the clamp setscrews to fully engage both male and female seam portions together

Installation

Installation is as simple as placing the clamp on the seam and tightening the round point Torx Drive (T30) setscrews to the specified tension. Then, affix ancillary items using the included bolt. (See Linked Installation Manual Above)

5/5

“Heat Tape Pro did exactly what I needed it to do. Now I don’t have to worry about water leaking into my house, because I can tell when it’s working by the little light on the end of the cable.”

-Michael P.
Amazon Customer

4/5

“This heat tape works as advertised. It was delivered to me fast, and although it’s a little complicated to install, the documentation is good..”

-Shaun D.
Radiant Solutions Customer

5/5

“I install thousands of feet of heat tape every year. This is the best stuff I’ve found to protect my customers homes and give them the piece of mind they need.”

-Patrick B.
Professional Installer

Frequently Asked Questions

Yes. Radiant Solutions Company is based in Hopkins, Minnesota.

We are a family-owned business with less than 10 employees that has been in business since 2016. Our experience with ice dams goes far beyond that: our founder Steve started a business diagnosing and solving Ice Dam problems on customer houses for almost 35 years.

Yes.

Radiant Solutions has the most comprehensive installation system for Heat Tape that exists. We make accessories to install heat tape on almost any kind of roof.

Click here to learn about product specifically for Natural Cedar Roofs

Click Here to lear about products for synthetic cedar roofs

The type of clip you need for your heat tap installation is based on what kind of roof you have.

We are building a hand guide to identify what kind of roof you have and find the clips that can/should be used with that roof-type.

View the Guide Explaining What Clips You Need Here

To know how many clips you need to buy, there are two things you need:

  1. Some Basic measurements regarding your installation area & some considerations to note
  2. Our handy Heat Tape Calculator to punch in your measurements & notes

We have a guide on How to Measure for Purchasing Heat Tape that will help you. Once you have your measurements, you can find our Heat Tape Calculator here.

Here’s a handy guide that explains the steps of measuring so you know which length of heat tape to get.

Measuring the area of your roof that is affected by ice dams so you know how much heat tape to get is not overly complex, but it does have a few variables. Use our Heat Tape Measuring Guide to understand the process and print a worksheet that you can use to make sure you have all the right numbers.

Once you have all the measurements and considerations you need, use our Heat Tape Calculator to calculate the size of heat tape you should get.

Including a thermostatic heat tape switch or controller in your installation will cut power to your heat tape in times it is not needed. This will lessen your environmental footprint and save you money.

Savings will always depend on the weather and how often you have temperatures above the threshold that the switch turns on your heat cable. In most situations where heat cable is needed, savings will offset the cost of the ThermaCord and then some.

Yes!

And if you are using Heat Tape Pro on your roof / eave to resolve an ice dam issue, you should use heat tape to make sure there’s a clear path through your gutters for water to escape your roof. If you don’t do that, the water could just refreeze in your gutters. You also want to get the downspouts too.

Be careful if you plan on using heat tape Only in your gutters.

There is a common misconception that gutters are a root cause of ice dams. This misconception can lead people astray when creating their strategy for ice dam deterrence. If you have an overhang on your roof (an eave), the chances are very good that you problem exists on your roof before the gutter.

Learn More about How Ice Dams Form Here

Yes!

Installing our heat tape on your standing seam roof can be very effective in combating ice dam formation. There’s two main products used to install heat tape on your standing seam metal roof: The S-5 SR Heat Tape Clip, and the standard ice dam heat tape clip.

S-5 SR Clip for Heat Tape & Standing Seam Roofs

Installing Heat Tape on a Standing Seam Roof with the S-5 SR Heat Tape Clip
The S-5 Heat Tape Roof Clip is a new, patented roof clip design specifically for standing seam applications with a focus on ease of install and effectiveness. It is used in conjunction with the S-5 Base, which needs to be purchased separately. The S-5 base is designed to clamp onto the seam of a metal roof as the S-5 Clip holds your ice dam heat tape into position. Can be set up in a single or dual-clip configuration. (See product page for more info)


Installing Heat Tape on a Standing Seam Roof with Standard Roof Clips

There are specific ways/configurations used when installing heat tape on a standing seam / metal roof using standard heat tape clips. The following (2.6 – figure 16.0 & 17.0) shows a snippet of the HeatTape Pro installation manual showing two different clip configurations, more info can be found in the manual itself: Heat Tape Pro installation Manual

We don’t install heat tape, but we know who does.

We work with licensed roofers, electricians and other contractors as Installers of Radiant Solutions Products. We know of installers all over the country.

If you are interested in finding a Heat Tape PRO™ installer in your area, click here to submit your info. If we have an installer we know of in your area, we will send you a recommendation.