
3 Alternate Methods of Gutter De-Icing Cable Installation
Installing heat cable in gutters and downspouts requires proper termination methods to ensure long-lasting performance and prevent system failures. The most critical area for heat cable protection is at the mouth of the downspout, where damage from sharp edges, weather exposure, and external factors causes the majority of heat tape system failures.
This guide covers three proven installation methods that protect your heat cable investment while maintaining effective ice dam prevention throughout the winter season.
Why Proper Downspout Termination Matters
The mouth of the downspout represents the highest risk area for heat cable damage. Sharp metal edges can cut through cable jacketing, while exposure to foot traffic, lawn equipment, pets, and children creates multiple failure points. According to industry data, improper downspout termination accounts for approximately 60-70% of premature heat cable system failures.
Common causes of downspout-related cable damage include:
- Sharp edge cutting: Metal downspout edges slice through cable protective jacketing
- Physical impact: Weed whackers, lawnmowers, and foot traffic damage exposed cables
- Weather stress: Freeze-thaw cycles cause cable movement against sharp surfaces
- Animal interference: Pets and wildlife can chew or pull on exposed cables
Heat Cable Requirements by Downspout Size
| Downspout Type | Cable Runs Required | Reasoning |
| Standard Residential (2×3″ or 3×4″) | 1-2 runs | Single run sufficient for most applications |
| Large Residential (4×5″ or larger) | 2 runs | Better coverage prevents ice formation |
| Commercial Downspouts | 2 runs minimum | Higher water volumes require increased capacity |
Pro Tip: When in doubt, use two cable runs. The additional coverage provides better ice prevention and system redundancy.
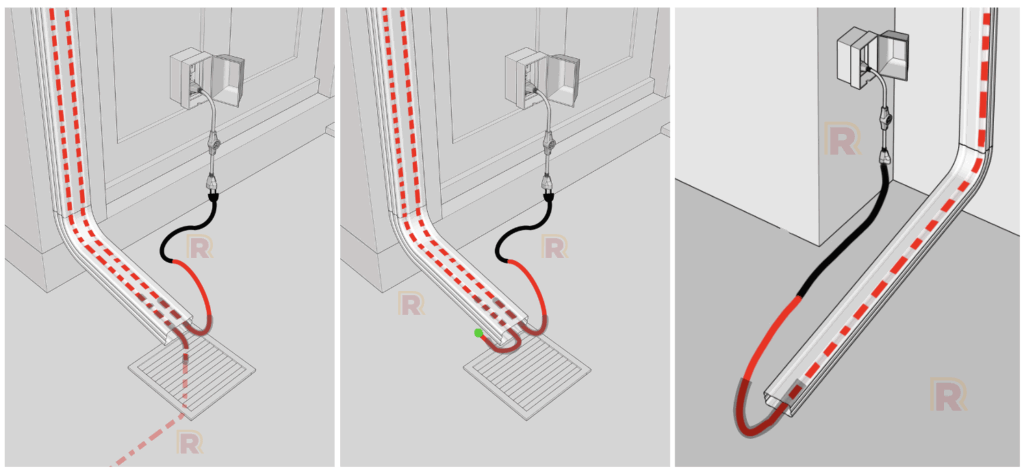
Method 1: Terminating in a Ground Drain
In this method, Heat Tape PRO self-regulating heat cable is run down through the gutter and downspout. At the bottom, it is passed through a grate into a ground drain. CableGuard is used to protect the exposed areas of the cable. The cable then runs along the bottom of the gutter.
Advantages of Ground Drain Termination
- Complete protection: Cable ends are fully enclosed within the drain system
- No visible termination: Creates clean, professional appearance
- Reduced damage risk: Eliminates exposure to most common damage sources
- Continuous operation: Cable can extend below frost line for enhanced protection
Installation Considerations
Ground drain termination works best when existing drainage infrastructure is present. Ensure the drain grate openings are large enough to accommodate the cable while maintaining proper water flow. The cable should be secured within the drain to prevent movement during heavy water flow periods.
Method 2: Using a GlowCap™
This is a fantastic use of our patented GlowCap™ LED indicator technology. The heat cable is run down through the gutter and downspout. Installers leave the end of the cable exposed at the bottom opening of the downspout. This allows the indicator light in the Glow-Cap™ to be seen easily throughout the winter, verifying that the cable is working from one end to the other.
Why GlowCap™ Installation is Superior
The GlowCap™ method provides the only visual confirmation system available in the heat cable industry. This patented technology offers several critical advantages:
- Instant system verification: Green LED confirms proper operation at a glance
- Troubleshooting capability: Quickly identify system issues without testing equipment
- Professional appearance: Clean, finished look that enhances property aesthetics
- Weather resistance: Designed to withstand harsh winter conditions
GlowCap™ Installation Best Practices
Position the GlowCap™ where it’s easily visible from ground level but protected from direct impact. The LED indicator will glow green when the system is operating properly, providing immediate confirmation that your ice dam prevention system is working throughout the winter.
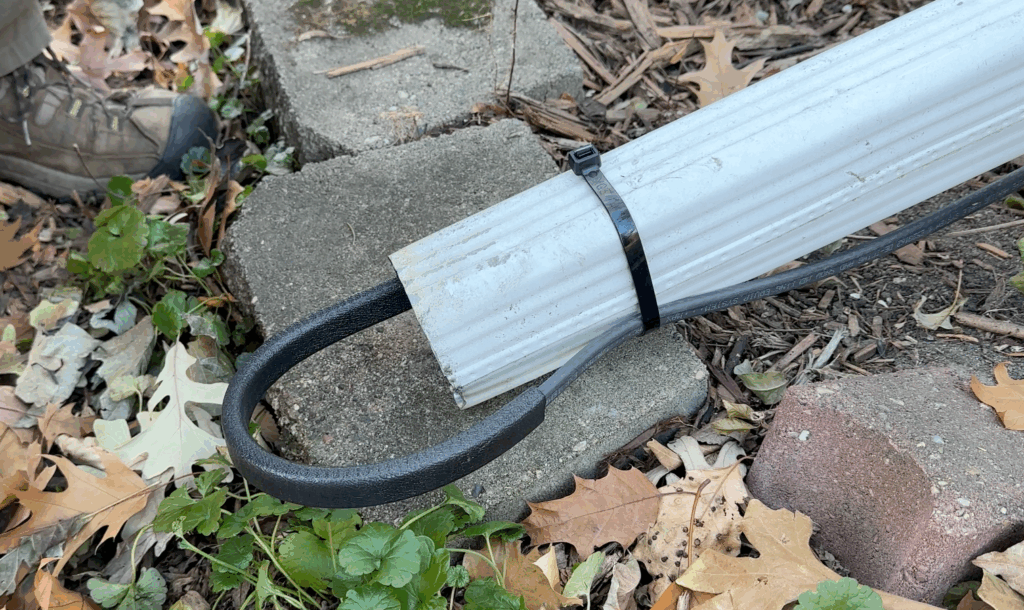
Method 3: Securing with a Cable Tie
The heat cable is run down through the gutter and downspout. Where the cable exits the bottom of the downspout, it is secured against the exterior of the downspout with a large cable tie. The cable continues up into and along the bottom of the gutter.
Cable Tie Securing Technique
Use heavy-duty cable ties (minimum 50-pound tensile strength) to secure the heat cable against the downspout exterior. This method provides:
- Strain relief: Prevents cable movement that can cause cutting damage
- Easy installation: Requires only basic tools and materials
- Adjustable positioning: Cable ties can be repositioned as needed
- Cost-effective: Minimal additional materials required
Pro-Tip: You can use a large cable tie (‘zip-tie’) to secure the heat cable against the downspout to keep it more protected. Always read the installation manuals for all products before you begin!
Cable Protection: Your Best Insurance Policy
Regardless of which termination method you choose, Cable Guard protection serves as inexpensive insurance against damage. This C-shaped protective channel shields your heat cable from:
- Sharp metal edges
- Impact damage
- Abrasion from movement
- UV degradation
- Animal interference
Cable Guard Installation Guidelines
Install Cable Guard at all potential damage points, including:
- Downspout entrances and exits
- Sharp roof edges
- Areas with foot traffic
- Locations near landscaping equipment operation
Common Installation Mistakes to Avoid
Based on decades of field experience, these errors cause the majority of downspout-related failures:
- Insufficient cable protection: Skipping Cable Guard to save costs results in expensive repairs
- Improper securing: Loose cables create movement that causes cutting damage
- Wrong cable positioning: Cables placed where they contact sharp edges will fail
- Inadequate drainage consideration: Blocked water flow can cause ice backup above the cable
Professional Installation vs. DIY
While approximately 50% of Heat Tape PRO customers install the system themselves, downspout termination requires careful attention to detail. Consider professional installation if:
- Multiple downspouts require treatment
- Complex roof configurations are present
- Local building codes require licensed installation
- You’re uncomfortable working at height
Professional installers in our network have experience with all three termination methods and can recommend the best approach for your specific situation.
Measuring for Downspout Heat Cable
Before selecting your installation method, use our Heat Tape Calculator to determine exact cable requirements. Proper measurement includes:
- Total gutter linear footage
- Number and height of downspouts
- Required overhang coverage on roof surface
- Additional cable for proper termination method
System Controls and Automation
Enhance your gutter heat cable system with ThermaCord automatic controllers that turn your system on and off based on temperature. This automation:
- Reduces energy consumption by 30-50%
- Extends cable lifespan through reduced operating hours
- Provides consistent activation at optimal temperatures
- Eliminates manual system management
Product Links
Essential products for professional gutter heat cable installation:
- Heat Tape PRO – Self-regulating heat cable with 10-year warranty
- Cable Guard – Protective C-channel for damage prevention
- GlowCap End Seal Kit – LED indicator termination system
- ThermaCord Controller – Automatic temperature control
Get Professional Installation Help
Need help with your gutter heat cable installation? Our network of qualified installers has experience with all three termination methods. Find a certified Heat Tape PRO installer in your area who can ensure proper installation and optimal system performance.
How Much Cable Do You Need?
Use Our Heat Cable Calculator
Contact Information:
Phone: 877-387-4218
Address: 1515 5th St S Suite K, Hopkins, MN 55343
Website: radiantsolutionscompany.com