
Open downspouts on commercial and residential properties face unique ice accumulation challenges. Unlike enclosed drainage systems, exposed downspouts collect ice rapidly during freeze-thaw cycles, creating serious risks including property damage and public safety hazards.
We receive calls from architects, contractors and commercial property owners from around the country about the best approach to keeping ice from accumulating in open downspouts. Although one run of Heat Tape PRO will probably do the job, we generally recommend two given the amount of ice that can quickly pile up in these downspouts, resulting in serious liability including property damage and public safety concerns.
The double-run approach provides redundancy and increased heat output where it matters most.
Self-regulating heat cable is the only reliable choice for downspout ice prevention. Unlike constant-wattage cables sold at big-box stores (brands like EasyHeat or FrostKing), self-regulating systems automatically adjust their power output based on ambient temperature.
This matters in downspouts because:
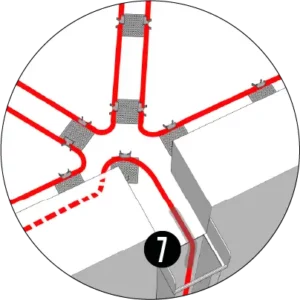
The illustration below shows two common installation scenarios for downspout heat cable systems. On the left, a pocketed scupper passes through a parapet wall from a flat roof before entering the downspout. On the right, the diagram shows a typical “star pattern” used on flat roofs, where heat cable clips are glued directly to the membrane using SB-190 adhesive.
In both examples, CableGuard™ is used where the cable transitions vertically into the downspout. This added protection is important because sharp sheet-metal edges are often present at these transition points and can damage exposed heat cable over time.
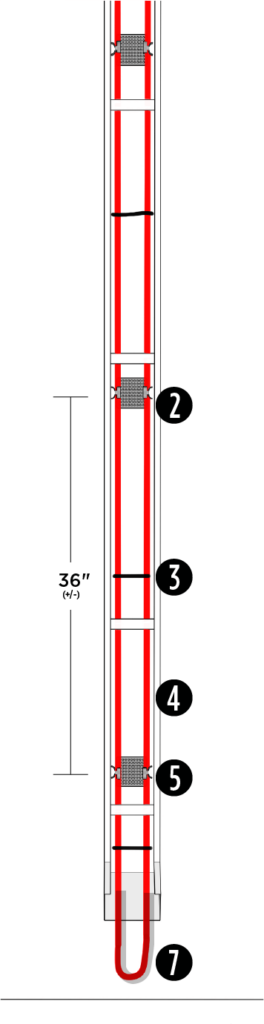
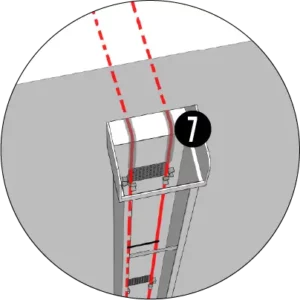
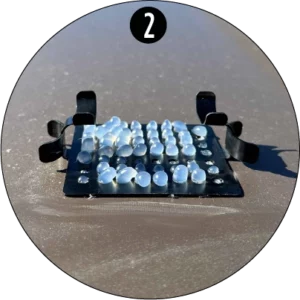
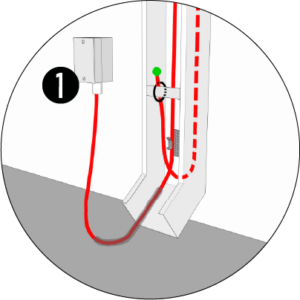
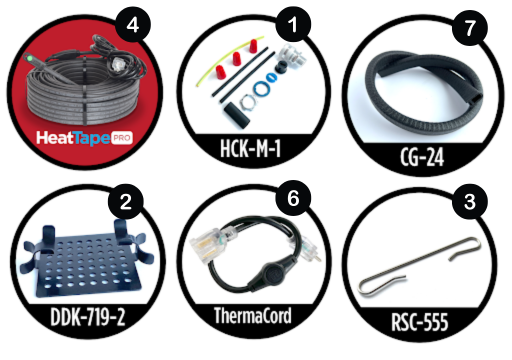
In hardwired applications, use the HCK hardwire connection kit to terminate heat cable into a junction box. Secure the GlowCap™ to a gutter strap with a zip tie to visually confirm the system is operational via the LED indicator.
Inside the downspout, use DDK-719-2 double cradle clips every 30″–36″ to secure two runs of heat cable. Use SB-190 adhesive to glue clips in position. Allow approximately 6 hours before setting the cable.
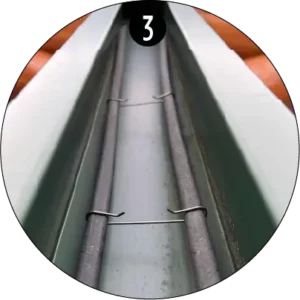
If desired, install RSC-555 separator clips between DDK clips to maintain even cable spacing and prevent cable-to-cable contact.
Install Heat Tape PRO self-regulating heating cable down the full length of the open downspout.
Run two parallel lines and form a loop at the bottom before routing the cable back upward. This loop ensures complete ice protection at the most critical accumulation point.
Everseal SB-190 adhesive bonds the DDK-719-2 clips to the installation surface. This industrial-grade roof sealant bonds metal, rubber, and other roofing materials even in cold conditions. A single tube can secure dozens of clips. The adhesive cures to form a durable hold that withstands freeze-thaw cycles.
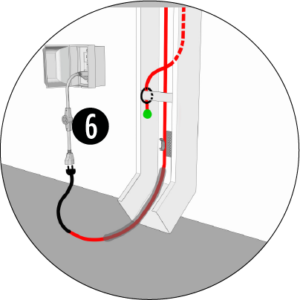
For applications using our pre-terminated Heat Tape PRO heat cable, use the ThermaCord™ to reduce energy consumption. Plug the heat cable into the ThermaCord™ and then plug the ThermaCord™ into the outlet.
The heat cable should form a loop at the bottom of the section inside the downspout before running back up. This loop ensures complete ice prevention at the most critical accumulation point. Always protect heat cable at the bottom loop with CableGuard to help prevent damage. CableGuard should be used at any location where the cable might be exposed to sharp edges, screw points or mechanical damage.
Using mechanical fasteners to secure clips: Never screw clips through downspout. Professional installers use adhesive-mounted clips or gutter-mounted systems that require zero roof penetration.
Insufficient cable length: Always account for the full vertical run plus the loop at the bottom. Measure twice before ordering cable to ensure adequate coverage.
Missing cable protection: Sharp metal edges will eventually damage unprotected cable. CableGuard provides essential abrasion resistance at transition points.
Incomplete melted path: Be certain to create a complete melted pathway to allow water at both the top and bottom of the downspout to travel freely.
Heat Tape PRO systems require minimal maintenance, but regular monitoring ensures reliable performance throughout winter.
Check the GlowCap indicator: A green LED light confirms the system is working. If the light is off during freezing weather, investigate immediately.
Annual system check: Before winter, test the system by plugging it in during moderate temperatures. Verify all connections are secure and the cable feels slightly warm to the touch.
Looking for a qualified installer in your area? Submit your information here and we’ll connect you with experienced professionals who install Heat Tape PRO systems.
For more detailed installation guidance, check out our complete guide on installing heat tape in gutters and downspouts.
