

To effectively prevent ice dams, roof heat cables should extend at least 6 inches beyond the plane of your exterior wall. This ensures the cable crosses the “origin zone” where ice dams typically form—right above the top plate where your heated attic space ends and the cold overhang begins. By creating a melted pathway through this critical zone, water can safely drain off your roof instead of refreezing at the eaves.
As a refresher, here’s how ice dams are made:
Warm air escapes a heated area of the home interior, warming the roof deck. This melts the snow above, which sends meltwater down the roof to the unheated eave, where it refreezes to form an ice dam.
The University of Minnesota Extension explains the cycle clearly: “The snow on a roof surface that is above freezing will melt. As water flows down the roof it reaches the portion of the roof that is below 32°F and freezes. This causes the ice dam.”
In short, warm attic air heats the roof and melts snow, while the roof edges remain cold. This temperature difference causes melted snow to refreeze at the eaves, forming an ice dam that can trap water behind it. Without intervention, this trapped water can work its way under shingles and cause significant damage to your roof and home interior.
The origin zone of ice dams is normally located directly above the top of the exterior wall—exactly where the heated portion of your attic ends and the cold soffit begins.
While proper insulation and ventilation can help reduce uneven roof temperatures, heat cables provide a reliable solution for keeping drainage paths clear in areas prone to ice dam formation.
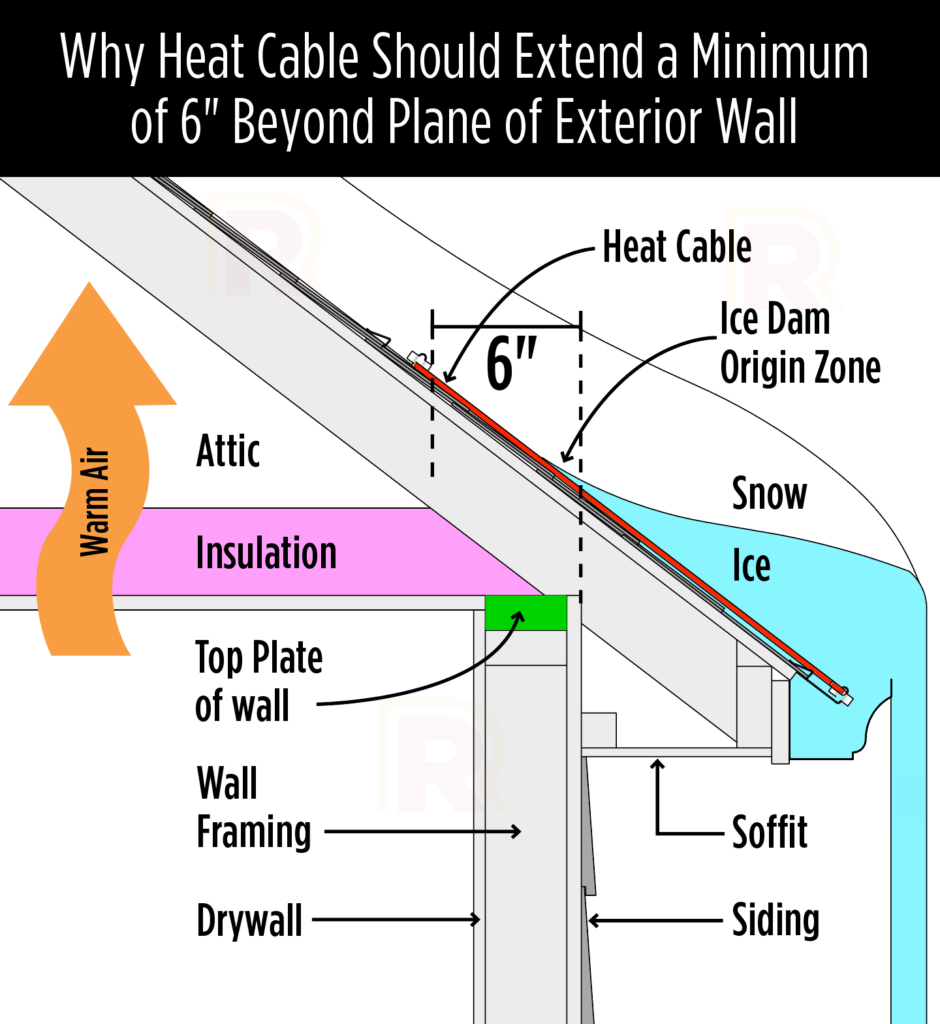
The six inch rule is about covering the origin zone of an ice dam, not guessing or eyeballing how far up the roof the cable should go. Ice dams typically originate just above the top plate of the exterior wall. This is the transition point where the heated portion of the house ends and the unheated soffit and eave begin. That temperature change is what sets the problem in motion.
To be effective, heat cable needs to extend at least six inches beyond the exterior wall plane below. Doing so ensures the cable crosses the origin zone where ice dams actually form. The goal is to create a continuous melted pathway through that zone so water melting higher up the roof can pass through and drain safely into the gutter or off the roof.
If the cable stops short of the origin zone, ice can still form just above it. When that happens, meltwater has nowhere to go and the system fails to do its job. In simple terms, the cable has to span from the warmer roof area into the colder roof area. That transition is what allows meltwater to escape instead of refreezing and creating another ice dam.
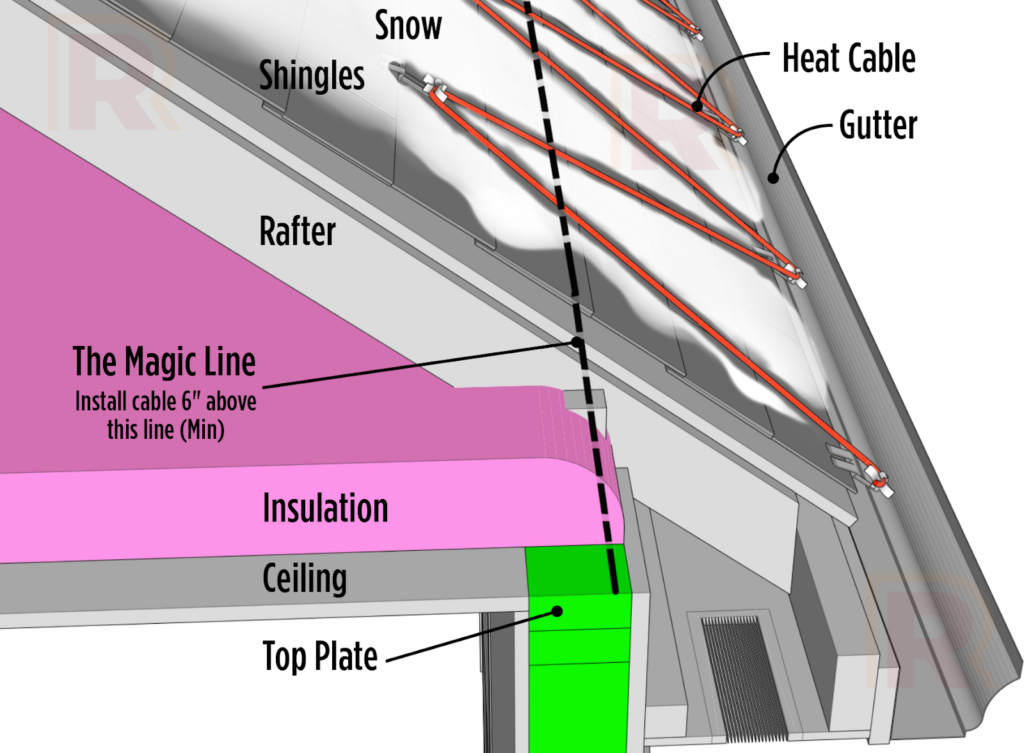
Here’s the anatomy of the standard stick-framed roof-to-wall intersection:
There is a critical reference point we call the “Magic Line,” which is directly above the top plate of the exterior wall. The heat cable installation must extend 6” above this line at a minimum.
The length of heat cable you need depends on your roof’s specific dimensions and layout. Key factors include:
| Factor | What to Measure |
| Eave length | Total linear feet of eaves requiring protection |
| Eave depth | How far your overhang extends from the wall |
| Roof valleys | Any valleys where snow and ice concentrates |
| Gutters | Linear feet of gutters needing cable |
| Downspouts | Number and height of downspouts |
Rather than guessing, use our Heat Cable Calculator to determine exactly how much cable you need. Input your specific roof measurements and the calculator will account for your roof’s particulars, including eave length, gutters, downspouts, and valleys—to output an accurate estimate of cable length needed.The calculator also provides guidance on the number of clips and accessories required for heat tape installation, ensuring you get everything you need in one order.