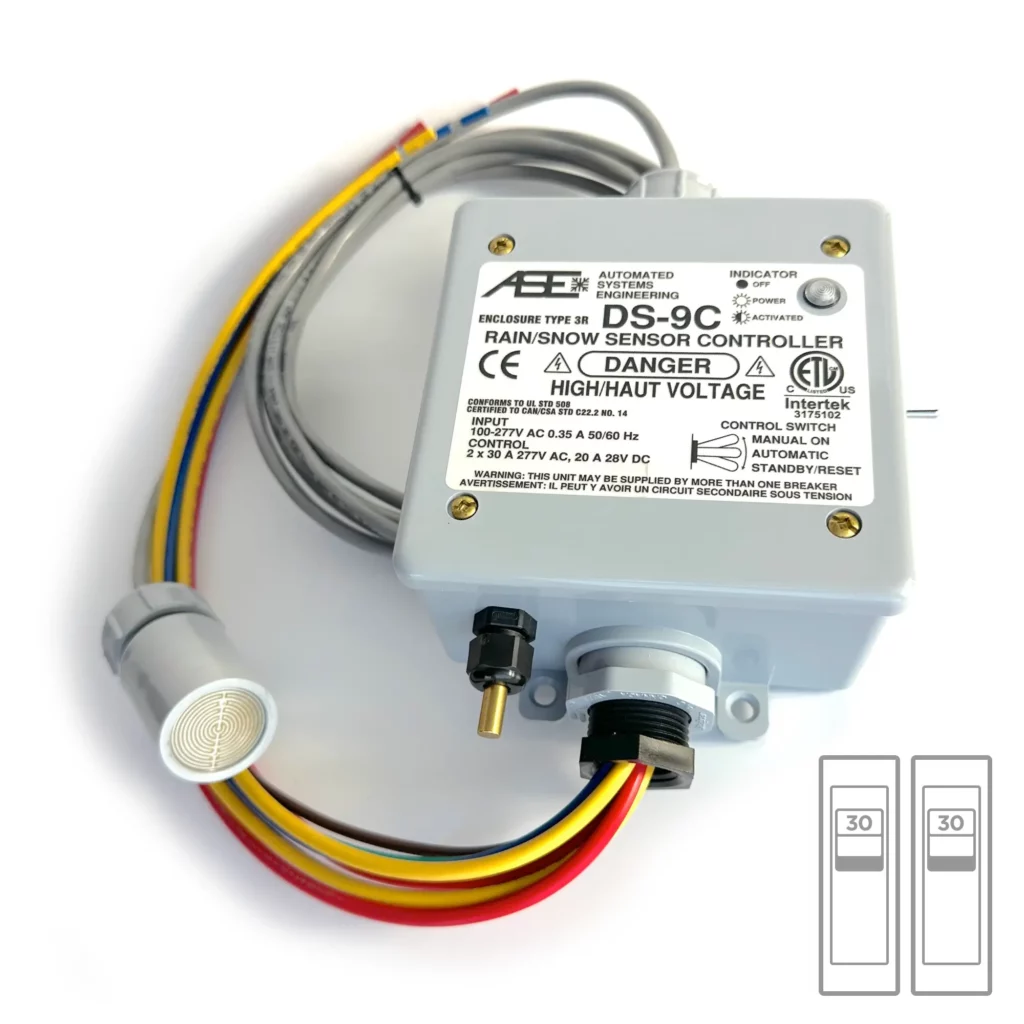
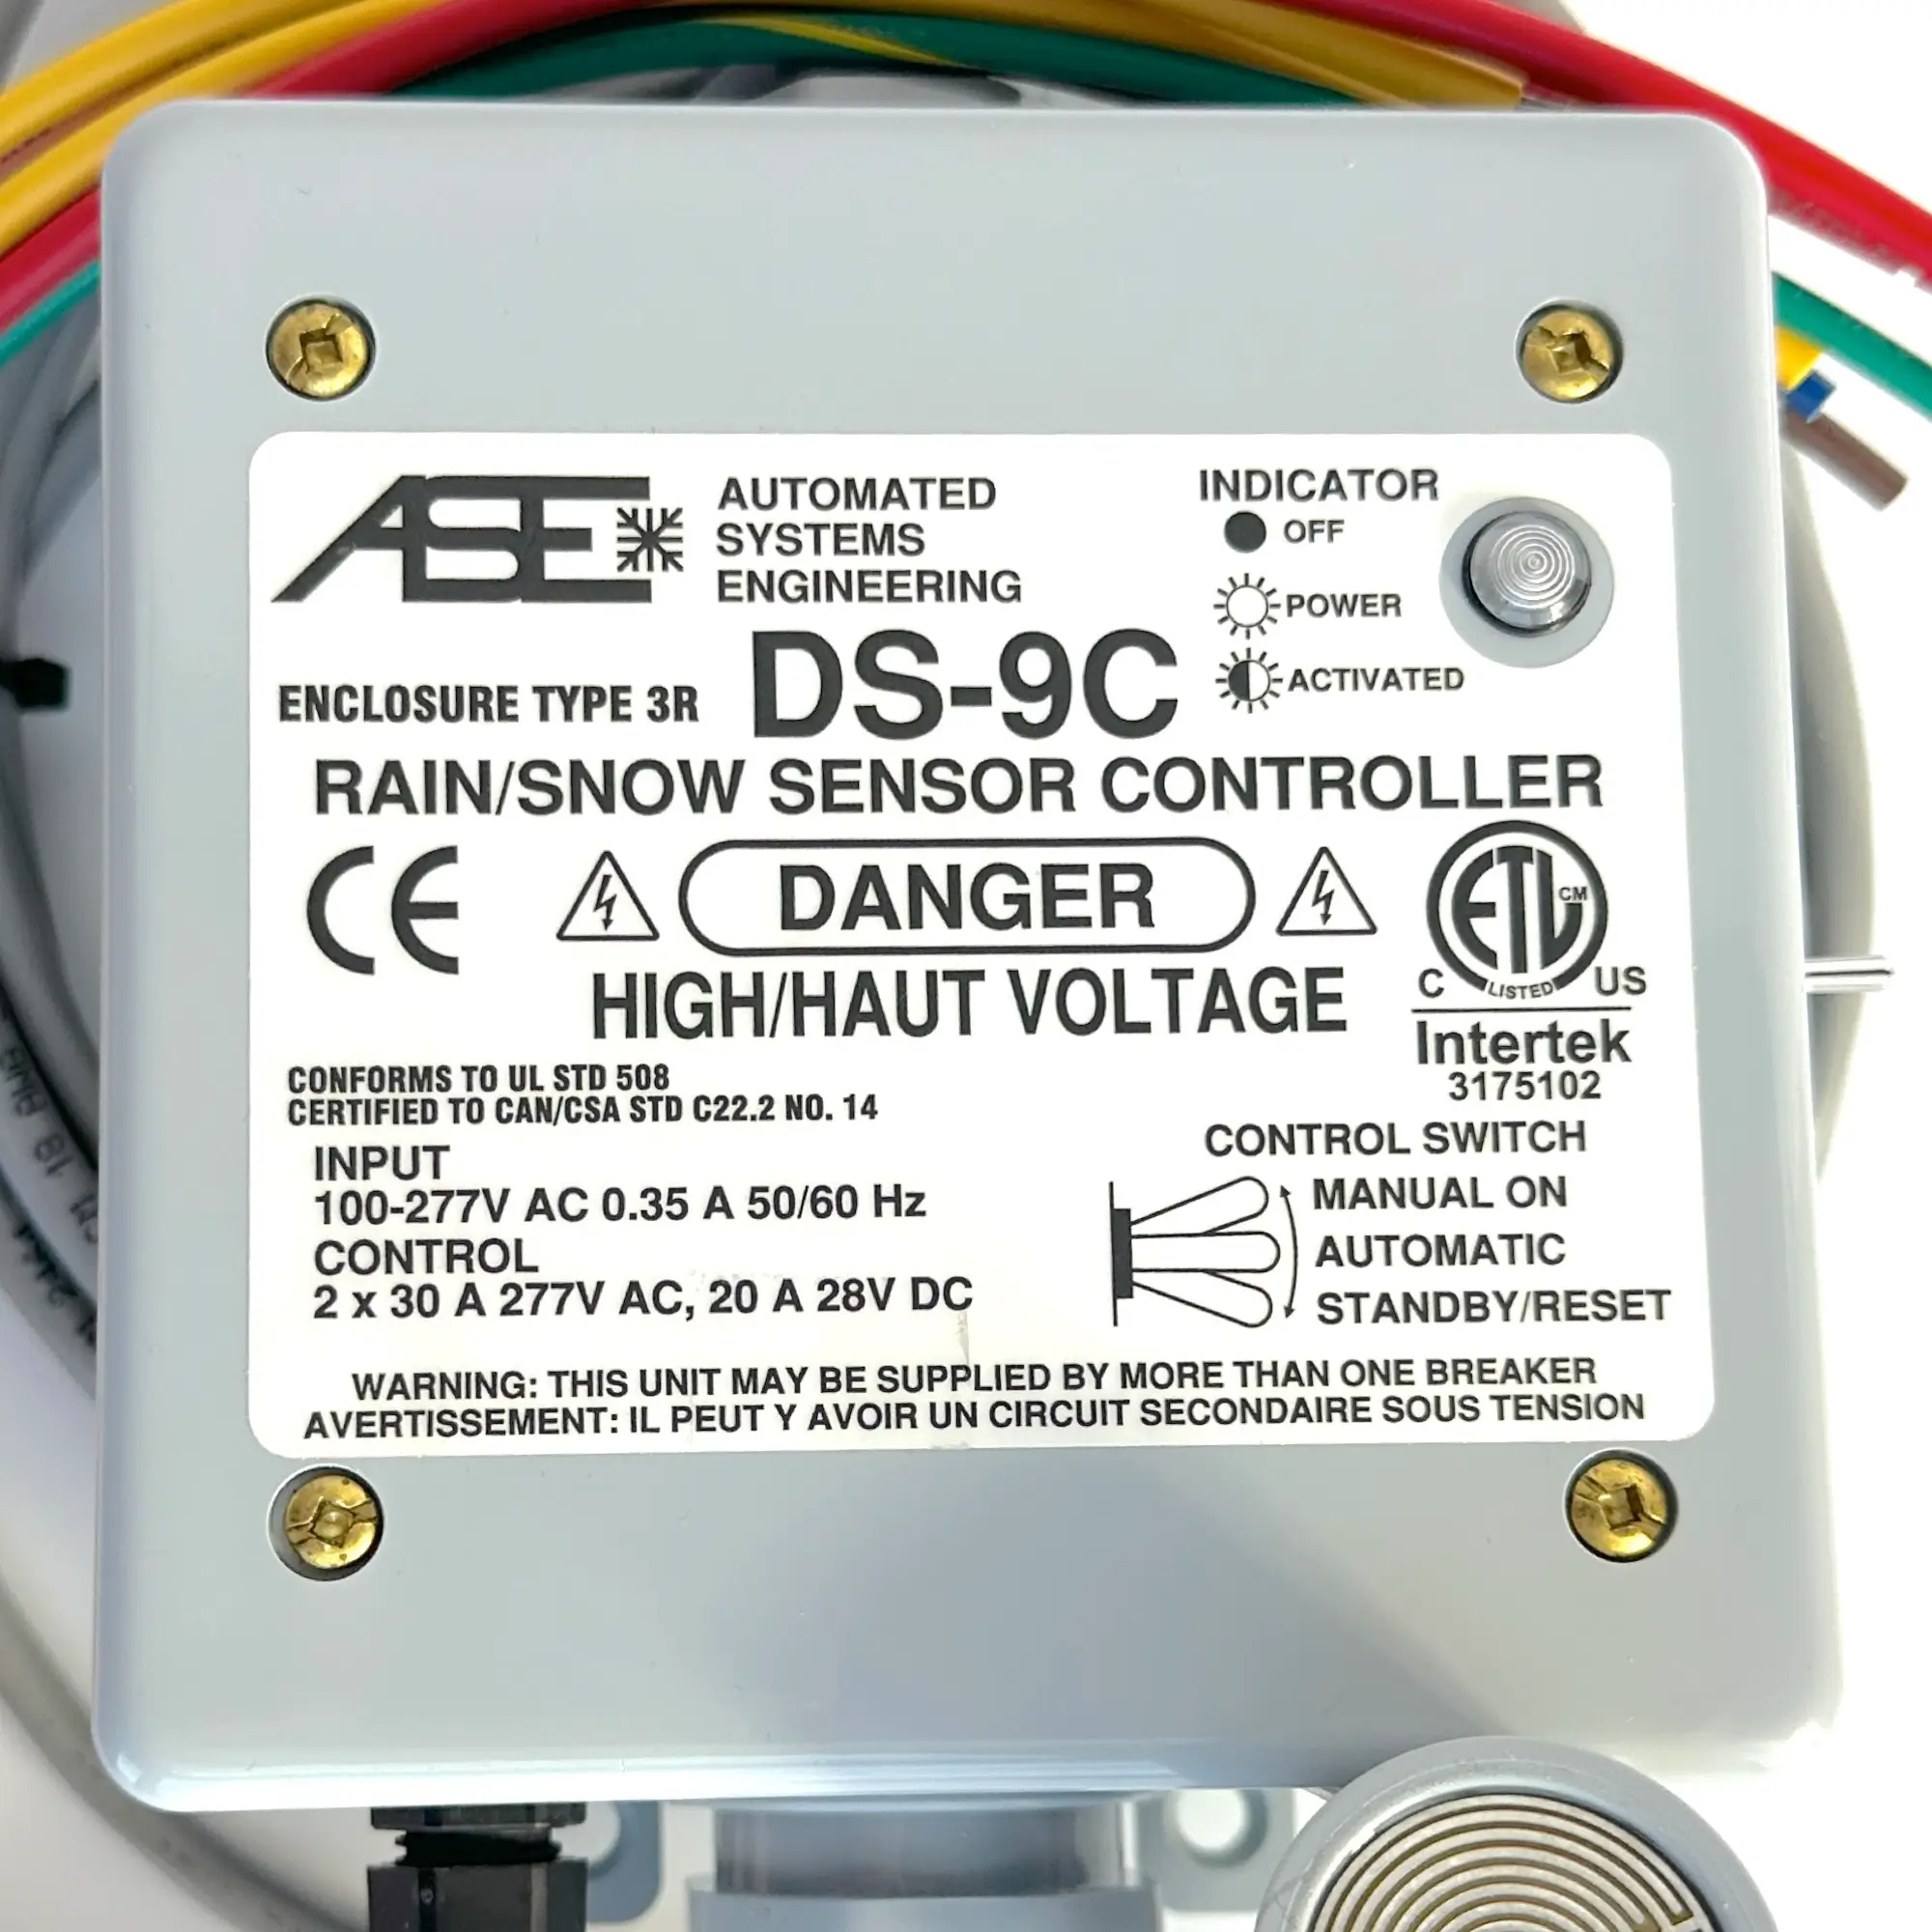
The DS9 turns hardwired heat cable systems on and off using both temperature and moisture, saving you a lot on your electric bill. This controller works with any Heat Tape PRO spooled cables from 6 watt to 8 watt, from 120 volts up to 277 volts. The DS9 will control TWO 30 amp circuits at 277 volts.
$399.95
15 in stock

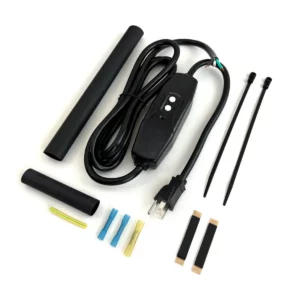
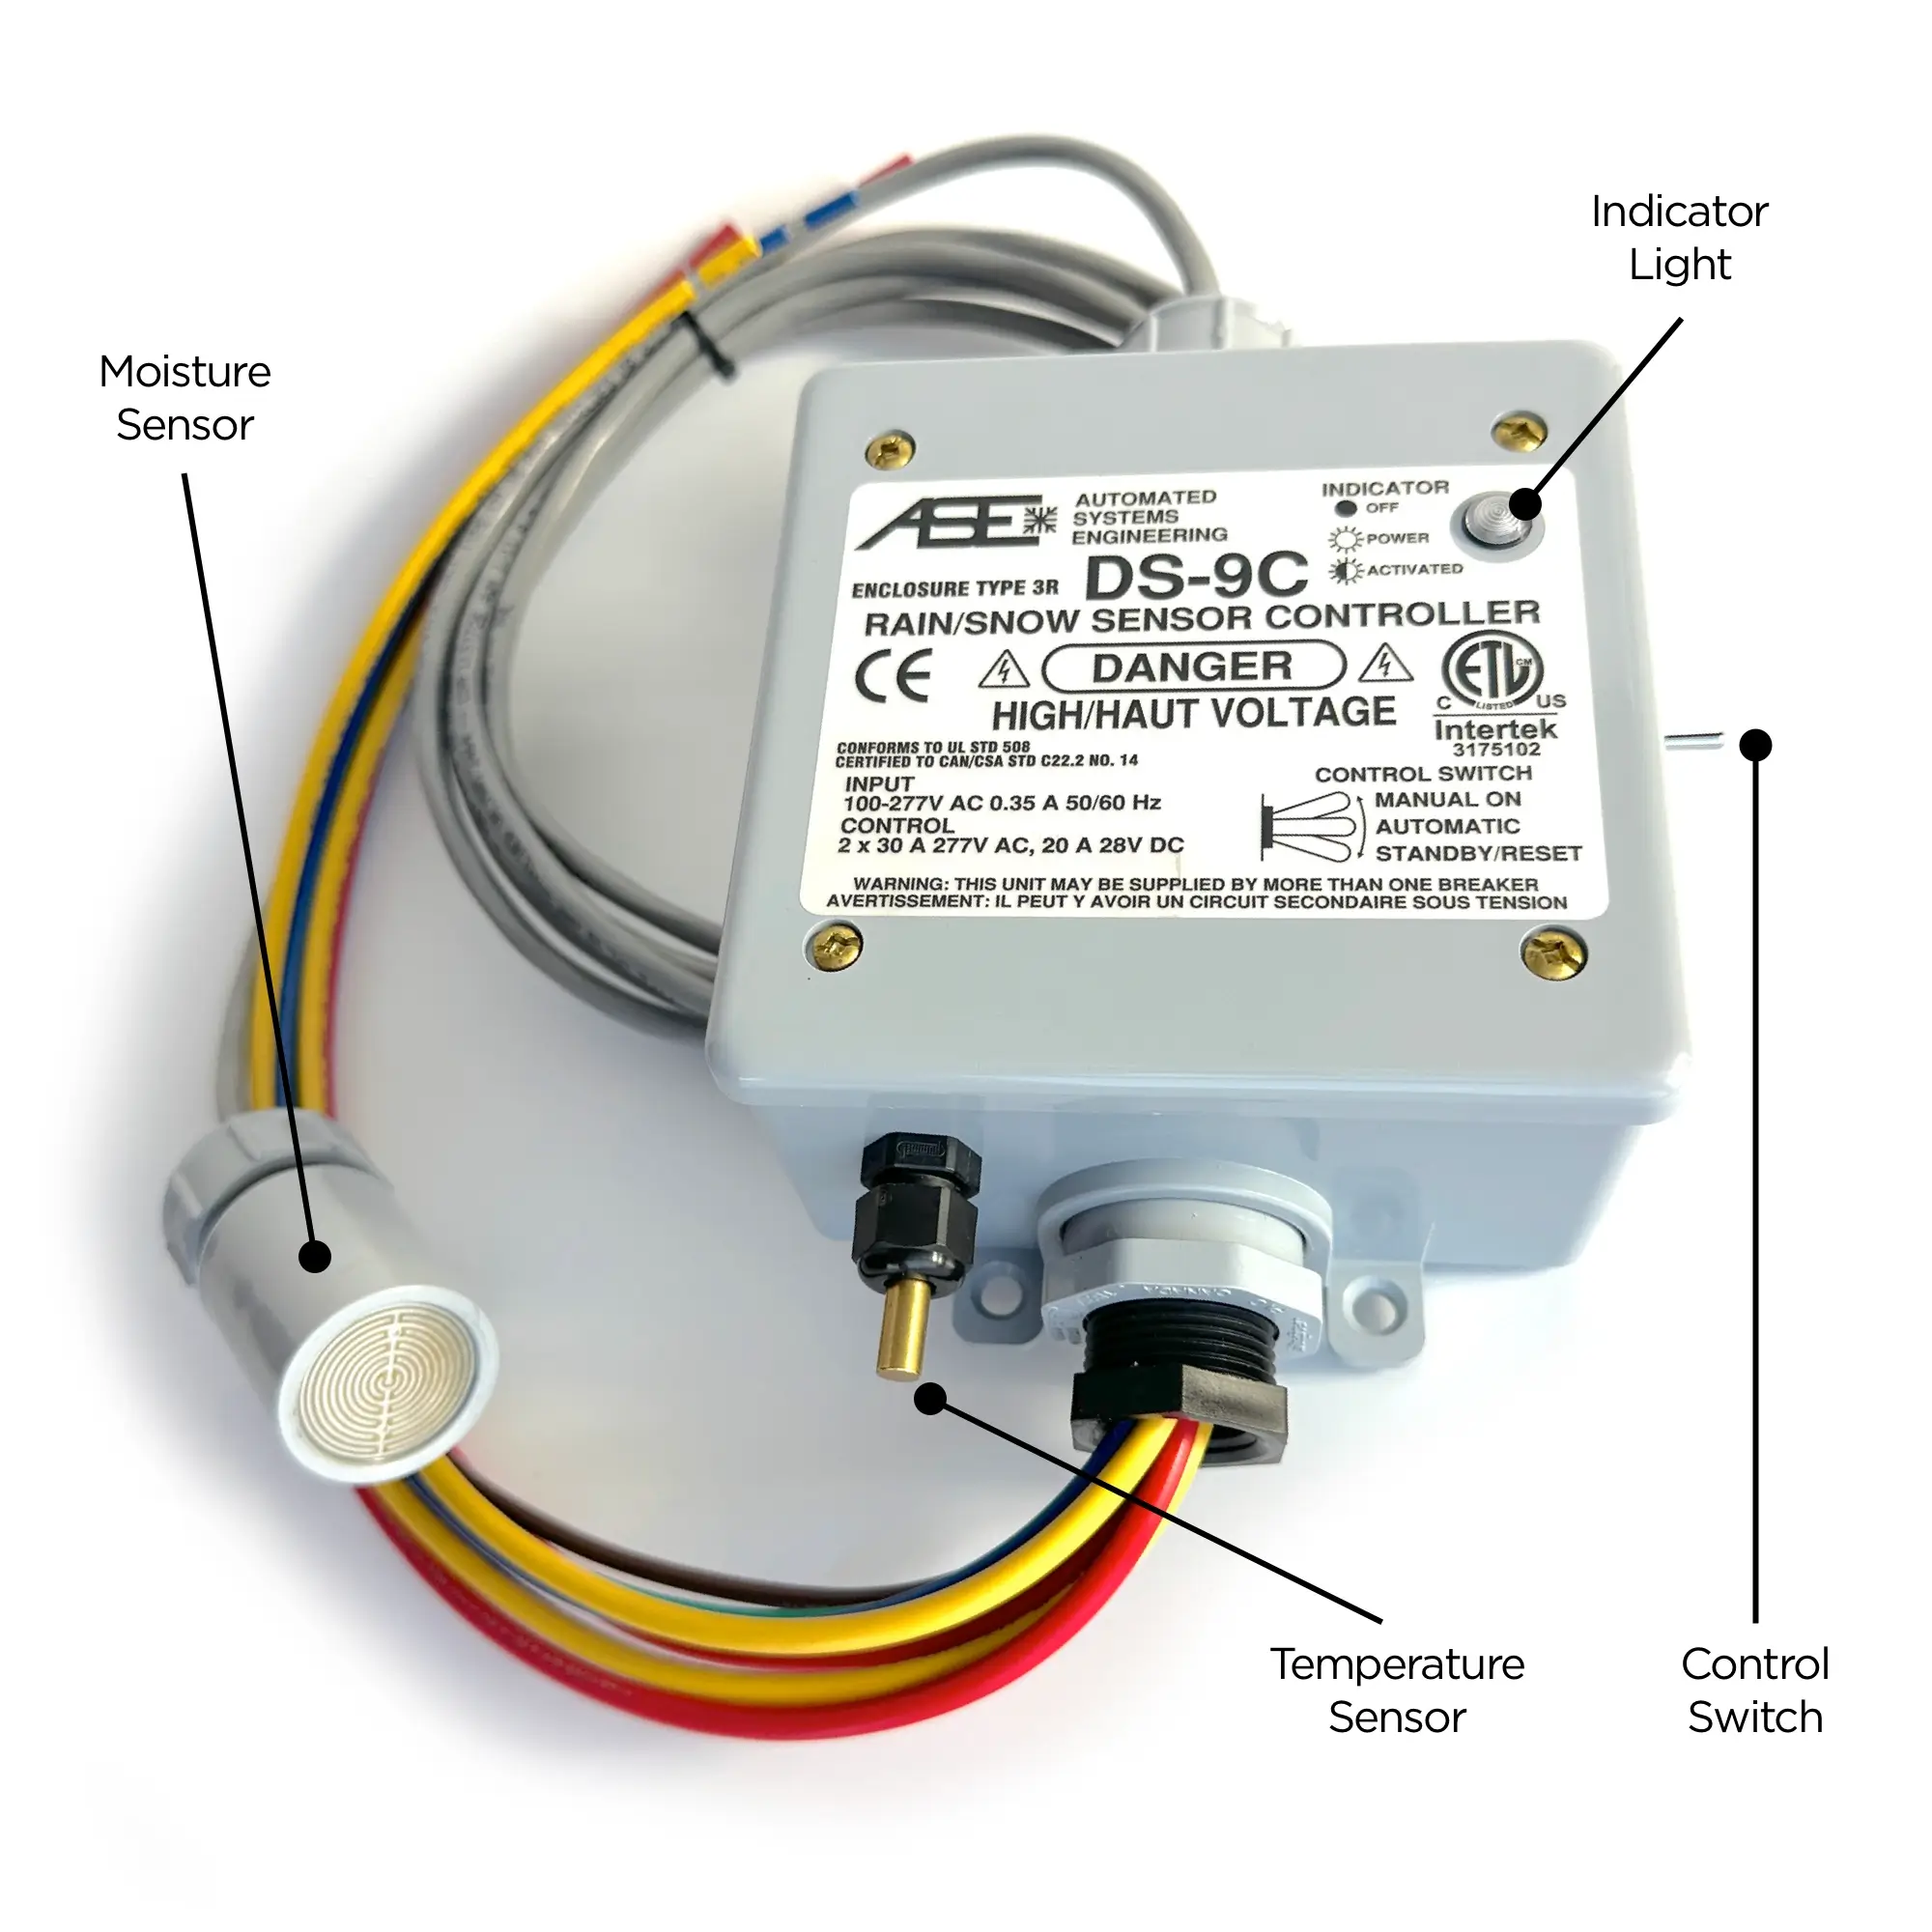
The DS9 unit operates by detecting environmental conditions through a base mounted temperature sensor and a remote heated precipitation sensor. When rain or snow land on the precipitation sensor, your cable system will turn on. The small heater in the sensor then rapidly evaporates the moisture, clearing the sensor in preparation for the next cycle. Smart stuff. The precipitation sensor is connected to a 10 foot cable and is intended for remote mounting near the roof deicing system. Use an EX-50 extension kit (with coupler) to put the precipitation sensor up to 60 feet away from the DS9 unit.
Signals from the sensor are supplied to the microcontroller which determines the appropriate action based on the system settings.
The difference between “sensor” and “controller” modes is the “Delay Off” drying cycle provided by each configuration. “Delay Off” time is the amount of time the sensor/controller will hold the load control relay(s) closed after the last detection of rain or snow. Proper setting of “Delay Off” assures that heat cables have created a sufficient melted pathway through the snow/ice on the roof.
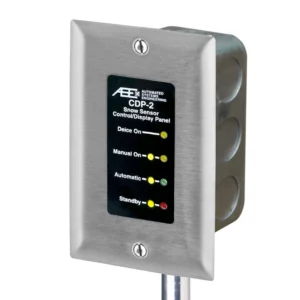
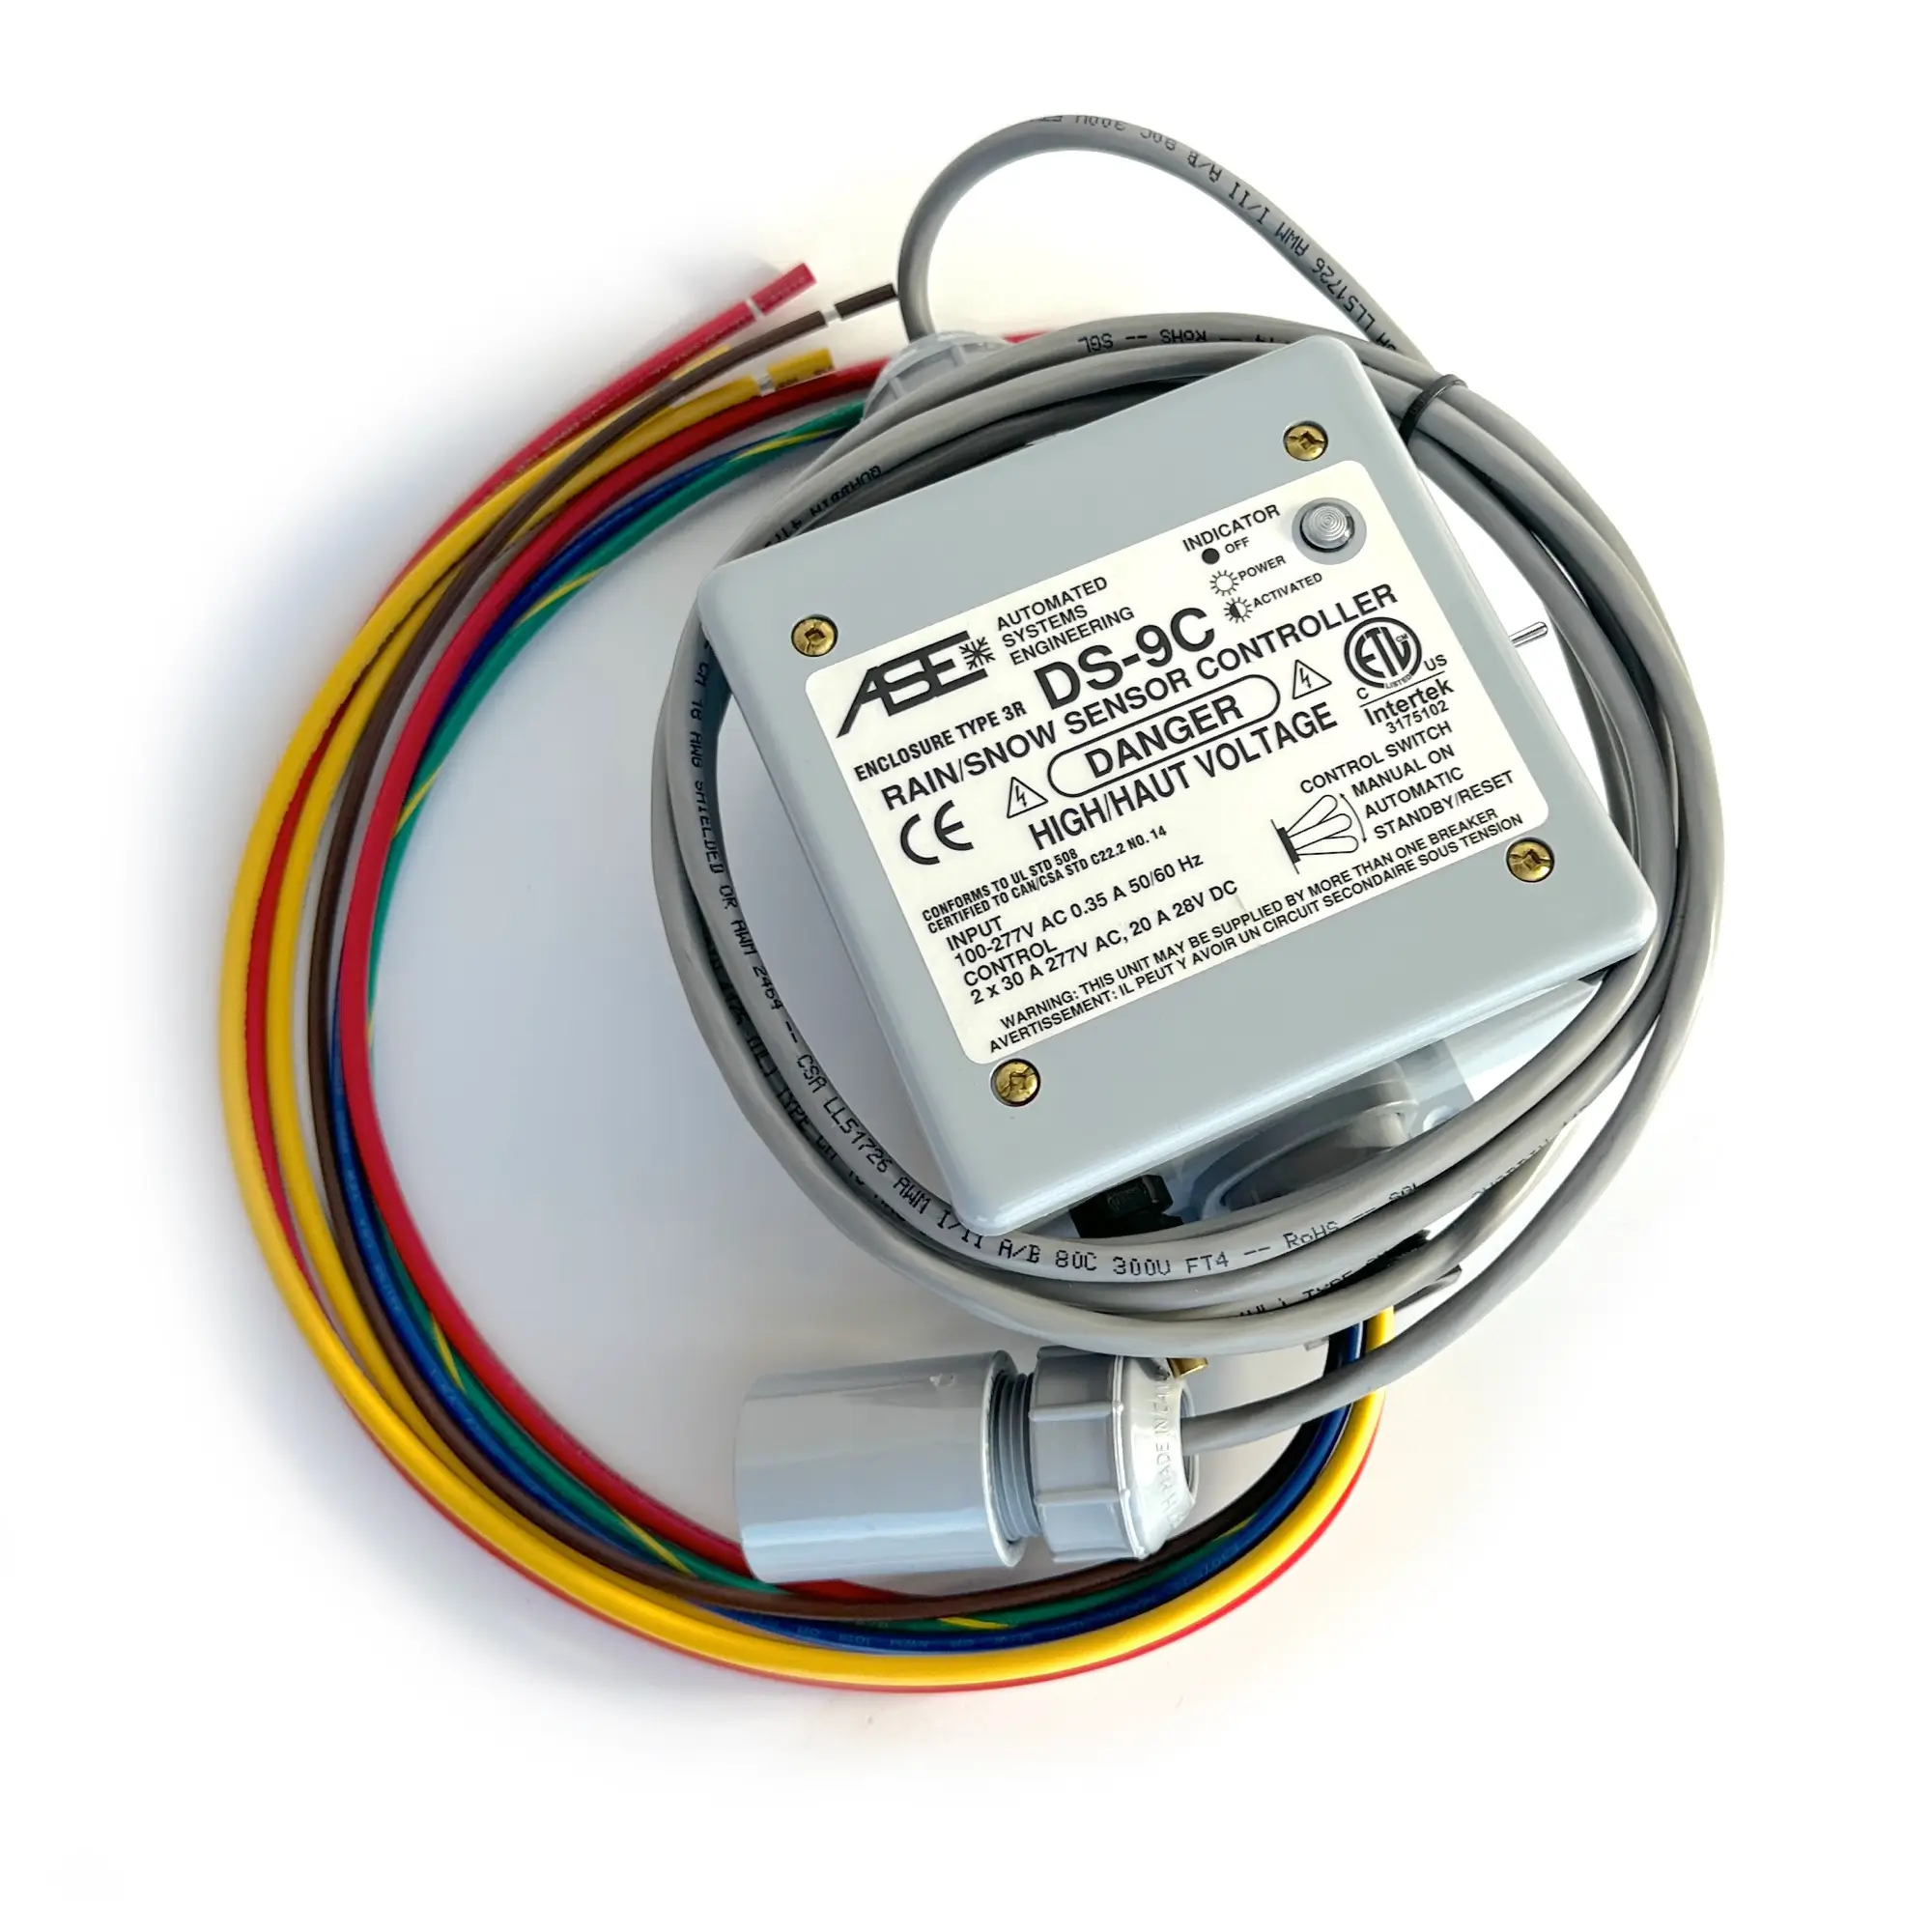
The DS9 heat cable controller detects snow and rain in addition to directly controlling the cables themselves by pushing power into the cable only when called for. The DS9 is constructed of a durable NEMA 3R enclosure, rated for outdoor use and has a 3/4 Inch conduit hub and operates from -40F to +185F. The power pigtails are #14 Blue/Brown/Green and the load pigtails are #10 AWG Yellow.
“Heat Tape Pro did exactly what I needed it to do. Now I don’t have to worry about water leaking into my house, because I can tell when it’s working by the little light on the end of the cable.”
-Michael P.
Amazon Customer
“This heat tape works as advertised. It was delivered to me fast, and although it’s a little complicated to install, the documentation is good..”
-Shaun D.
Radiant Solutions Customer
“I install thousands of feet of heat tape every year. This is the best stuff I’ve found to protect my customers homes and give them the piece of mind they need.”
-Patrick B.
Professional Installer
The DS9 automatically turns your hardwired heat cable system on and off by detecting both temperature and moisture conditions. When snow or rain hits the precipitation sensor, your heat cables activate. Once conditions dry up, the system turns off after a delay period you can adjust. Unlike the DS8, the DS9 can manage two separate heat cable circuits, making it ideal for larger or more complex installations.
The DS9 works with any Heat Tape PRO spooled cables from 6 to 8 watts, handling voltages from 120V up to 277V. It can control two independent 30-amp circuits, which makes it a better choice than the DS8 for multi-run systems. If you're using a different brand or type of heat cable, give us a call at 952-444-2044 and we'll help you figure out compatibility.
The DS9 comes with a 10-foot cable connecting the precipitation sensor to the controller unit. If you need more distance, you can extend it up to 60 feet using our EX-50 extension kit with coupler. This lets you mount the sensor right where the action happens on your roof while keeping the controller in a convenient location.
Yes, absolutely. The DS9 is designed for hardwired installations and works with 100-277 volt circuits up to 30 amps each. This is serious electrical work that requires a licensed electrician. The controller comes with detailed installation manuals, but leave the wiring to the pros for safety and code compliance.
The DS9 has three modes: "Manual On" keeps your heat cables running continuously (useful for testing or extreme conditions), "Automatic" lets the sensors control everything (normal operation), and "Reset" clears the system if needed. Most of the time, you'll set it to Automatic and let the controller do its job.
The savings depend on your local weather patterns, but the DS9 typically pays for itself within the first season or two. Instead of running heat cables constantly throughout winter, the system only activates when moisture is detected. In areas with variable winter weather, customers often see 30-50% reductions in their heat cable energy costs.
Yes, the DS9 has adjustable precipitation sensitivity settings. You can fine-tune how much moisture triggers the system—useful if you're getting false activations from light frost or want the system to respond to lighter precipitation. The delay-off drying timer is also adjustable so you can control how long the cables stay on after moisture clears.
The precipitation sensor is replaceable, which is a huge advantage. If ice, debris, or wear damages the sensor, you don't need to replace the entire controller—just swap in a new sensor. The bright LED activation light on the controller also helps you quickly see if the system is responding properly.
Absolutely. The DS9 operates in temperatures from -40°F to +185°F, so it handles even the harshest winter conditions. The NEMA 3R enclosure is rated for outdoor use and built to withstand the elements. This controller is designed for climates where ice dam prevention really matters.
The DS9 comes with the controller unit, precipitation sensor, and 10-foot connecting cable. You'll need to have your electrician provide appropriate conduit, wire nuts, and mounting hardware. If you need to place the sensor more than 10 feet from the controller, you'll want to add the EX-50 extension kit to your order.
No. The DS9 requires both cold temperatures and moisture on the sensor to activate your heat cables. This dual-trigger system prevents the cables from running during dry but cold conditions, saving electricity.
Yes. Unlike the DS8, which controls one 30-amp circuit, the DS9 can control two separate 30-amp circuits. This makes it a great choice for homes or buildings with multiple roof sections, long runs, or higher total cable loads.
Mount the sensor in an exposed area of your roof or gutter where snow and rain will naturally land. Avoid locations under overhangs or sheltered spots, since those won’t give accurate readings. Many installers place it in a valley or near the roof edge for best results.
Yes. The controller doesn’t care whether your self-regulating heat cable is installed on roof edges, in valleys, or inside gutters and downspouts. As long as the total load is within its electrical rating, the DS9 will manage it.
The controller includes an LED indicator that lights up when the system is active. You can also use the “Manual On” setting to force the cables on, which is a good way to test the system after installation or before the season starts.
The controller itself is maintenance-free, but you should check the precipitation sensor periodically to ensure it isn’t covered by leaves, debris, or ice buildup that could block accurate readings.
Yes, but only the control unit. The precipitation sensor and main unit must be installed outdoors where it can sense real weather conditions. The controller is typically mounted in a garage, utility room, or exterior electrical enclosure, with the sensor cable routed outside.
Yes. It’s used in both settings. Homeowners like it for automatic savings, while contractors use it on larger commercial roofs to manage power costs and extend cable life. The ability to handle two circuits makes it especially popular for commercial installs.
No. Quite the opposite. Self-regulating heat cable is designed to handle frequent cycling. In fact, using the DS9 actually extends cable life by reducing the number of hours it’s energized compared to systems that run continuously.
ThermaCord responds only to temperature, while the DS9 responds to both temperature and actual moisture. That makes the DS9 more precise, especially in climates with fluctuating winter weather. Plus, the DS9 can manage larger, hardwired systems on two circuits, while ThermaCord is for smaller plug-in setups.
We keep them in stock and ship same day from Minnesota, don’t ‘cha know. (Assuming you don’t order too late in the day!). Orders placed over the weekend will ship the next business day.
Click here to view or download the installation manual.
PipeFreezePRO comes with one or more 30ft rolls of high-quality fiberglass tape, but you can use any tape with a temperature rating of 150º F and above. Self-adhesive aluminum foil tape can be used but avoid standard tapes, including electrical tape and duct tape because they lose their adhesion when exposed to heat. Remember, it’s imperative to cover the pipe/heat tape assembly with pipe insulation (1/2″ minimum thickness). Think four easy steps: 1) cable on pipe, 2) tape on cable, 3) insulation on pipe/cable and 4) tape on insulation.
Pipe Freeze PRO can be overlapped during installation. This is a fundamental advantage of self-regulating heat cable over cheap, constant wattage cable found in hardware stores is that it can be overlapped without risk of shorting out or catching fire. So yes, overlap away!
The amount of heat cable needed for pipe freeze prevention is determined by a couple of simple factors including: Length of pipe, diameter of pipe, distance to power supply and number of valves.
Most of the time, we do not recommend a spiral cable application because it’s simply not necessary. It requires 3x the cable to do the same job.
Therefore, simply use a straight, single run of cable affixed to the bottom of the pipe (think 6 o’clock position) using the provided fiberglass installation tape. Next, add 1 foot of cable for every valve because you will be wrapping the valve with cable. For pipes less than 1″ in diameter, a single cable run is sufficient. For larger pipes, two cable runs are recommended. Keep in mind that plastic pipes are less thermally conductive so you may choose to use two cable runs on larger plastic pipes to be safe. Finally, if your outlet isn’t close to the pipe you are treating, factor in enough heat cable to reach your outlet (Pipe Freeze PRO does come with a 36″ power cord).
Finally, you must install insulation on your pipe and heat cable assembly in order for the system to operate effectively. See instructions for further details.
The cable can be exposed to wetness but the thermostat must stay dry to function properly. Use Pipe Freeze PRO for pipe freeze prevention applications only.
Consider using Heat Tape Pro inside of open drain pipes as that cable is rated for use in wet areas.
We are frequently restocking products and the one you need will soon be available. You can make a request to be notified when out of stock items are re-stocked.
Click Here to Submit your information to be notified of a Products Restock
Heat Tape Pro has the most comprehensive installation system that works on almost any kind of roof type.
For information about installing Heat Tape Pro on a Natural Slate Roof, Click here.
For information about installing Heat Tape Pro on a Synthetic late Roof, Click here.
Pipe Freeze Pro’s integrated thermostat turns power on and off automatically to the cable to save electricity. The thermostat is the lump located between the power cord and the heat cable. The thermostat triggers the cable to turn on at 37ºF and off at 50ºF, with a sensitivity range of +/- 4ºF. It’s a great feature that makes Pipe Freeze Pro unique among heat cables on the market.
Yes and no. The cable is approved for exposure to wet conditions but you should keep the thermostat dry for proper operation.
No. The thermostat need only be exposed to cold air. It does not hurt to have the thermostat attached to the pipe but it is not necessary. If you choose to attach it to the pipe keep in mind that the thermostat should not be covered with insulation.
No. You want the thermostat to react to the cold environment so it triggers the Pipe Freeze Pro to turn on.
Every Length of Heat Tape Pro has a cord length of 10-feet that is not included in the listed/state length. Meaning: A 100-foot Heat Tape pro will have a 100 feet of heated cable + a 10-foot unheated power cord.
Every Length of Pipe Freeze Pro has a cord length of 3-feet (36″) that is not included in the listed/state length. Meaning: A 30-foot Heat Tape pro will have a 30 feet of heated cable + a 3-foot unheated power cord.
Radiant Solutions has the most comprehensive installation system for Heat Tape that exists. We make accessories to install heat tape on almost any kind of roof.
Click here to learn about product specifically for Natural Cedar Roofs
Check out our full list of Frequently Asked Questions on our FAQ Page.
Take a Look at Our Heat Tape Installation Case Studies
Learn a Bit about Ice Dams and How & Why they Form