When protecting your gutters from ice dams, protect your ice dam heat tape from your gutters. Shield your heat tape from the sharp-edged transition from gutter to downspout, and hold your heat tape in place for maximum effectiveness in clearing gutter ice dams. Non-Corrosive aluminum; comes with 2 cable fastening ties. For use with all ice dam heat tape & de-icing cable, including all Radiant Solutions Pre-Assembled Heat Tape lengths & Ice Dam Heat Tape by-the-Foot.
$13.95
2248 in stock

“Heat Tape Pro did exactly what I needed it to do. Now I don’t have to worry about water leaking into my house, because I can tell when it’s working by the little light on the end of the cable.”
-Michael P.
Amazon Customer
“This heat tape works as advertised. It was delivered to me fast, and although it’s a little complicated to install, the documentation is good..”
-Shaun D.
Radiant Solutions Customer
“I install thousands of feet of heat tape every year. This is the best stuff I’ve found to protect my customers homes and give them the piece of mind they need.”
-Patrick B.
Professional Installer
Installing our heat tape on your standing seam roof can be very effective in combating ice dam formation. There’s two main products used to install heat tape on your standing seam metal roof: The S-5 SR Heat Tape Clip, and the standard ice dam heat tape clip.
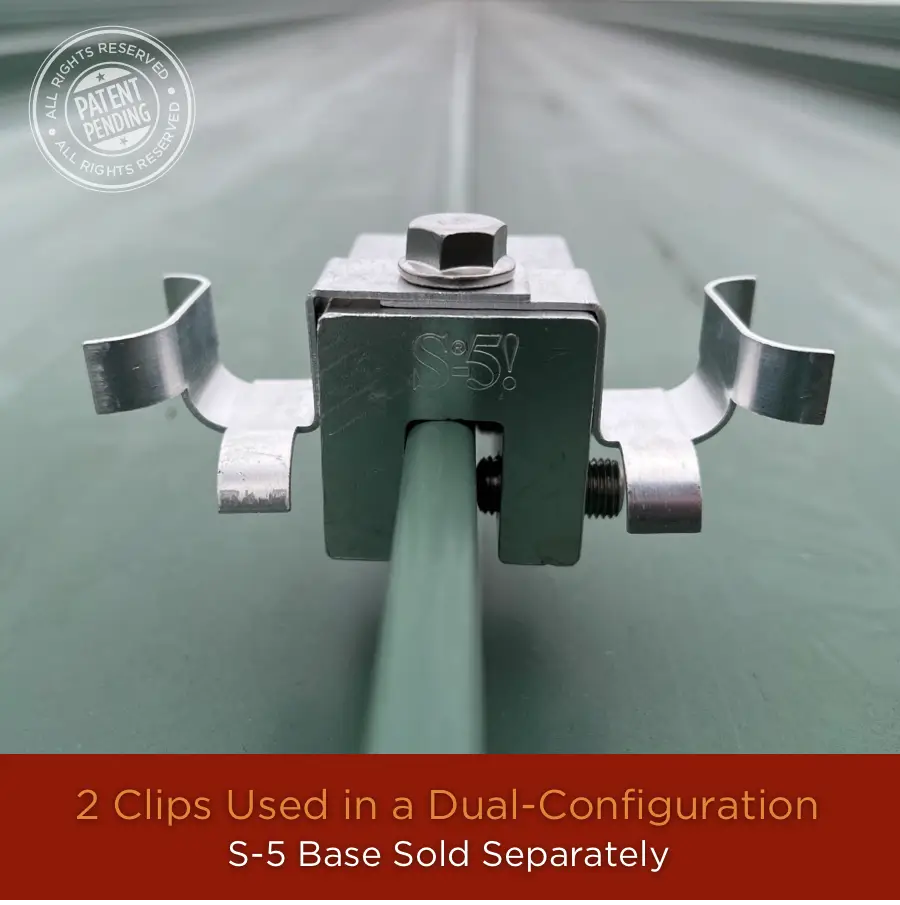
Installing Heat Tape on a Standing Seam Roof with the S-5 SR Heat Tape Clip
The S-5 Heat Tape Roof Clip is a new, patented roof clip design specifically for standing seam applications with a focus on ease of install and effectiveness. It is used in conjunction with the S-5 Base, which needs to be purchased separately. The S-5 base is designed to clamp onto the seam of a metal roof as the S-5 Clip holds your ice dam heat tape into position. Can be set up in a single or dual-clip configuration. (See product page for more info)
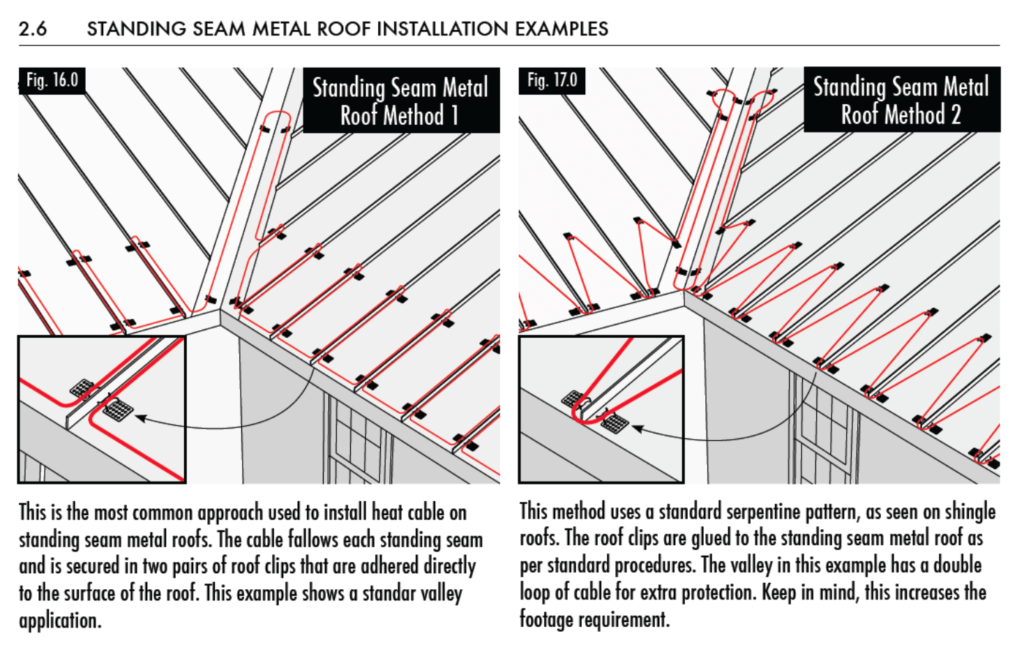
Installing Heat Tape on a Standing Seam Roof with Standard Roof Clips
There are specific ways/configurations used when installing heat tape on a standing seam / metal roof using standard heat tape clips. The following (2.6 – figure 16.0 & 17.0) shows a snippet of the HeatTape Pro installation manual showing two different clip configurations, more info can be found in the manual itself: Heat Tape Pro installation Manual
Heat Tape Pro has the most comprehensive installation system that works on almost any kind of roof type.
For information about installing Heat Tape Pro on a Natural Slate Roof, Click here.
For information about installing Heat Tape Pro on a Synthetic late Roof, Click here.
See Below
Measuring is not difficult and you can make measurements without going up on your roof or using a ladder if you err on the side of overestimating the distances. Here’s Radiant Solutions Guide to Measuring for Heat Tape, which gives a detailed overview of measuring and some tips and resources, if you think you need it.
Once you have your measurements, you can use our Heat Tape Calculator to help you determine the length of Heat Tape Pro you need, the number of Heat Tape Clips you’ll need, and misc. product considerations.
The terms heat cable, heat tape and heat trace are all used interchangeably to described heated cables used to protect pipes from freezing, preventing roof and gutter ice dams from forming and for safeguarding temperature sensitive components.
Other terms we’ve seen used regarding Heat Tape are:
This includes, but is not limited to:
The type of roof you have determines the roof clips and accessories needed. Check out our Heat Tape Installation Accessories.
Including a thermostatic heat tape switch or controller in your installation will cut power to your heat tape in times it is not needed. This will lessen your environmental footprint and save you money.
Savings will always depend on the weather and how often you have temperatures above the threshold that the switch turns on your heat cable. In most situations where heat cable is needed, savings will offset the cost of the ThermaCord and then some.
Heat Tape PRO can be use with any gutter system made, be it open, closed, metal, plastic, vertical or horizontal. Heat Tape PRO will work throughout the winter to keep an ice free path open for water so it can escape and move away from your home.
Keep in mind that if your home has ice dams in addition to ice in your gutters, you will want to install Heat Tape PRO on your roof to address that problem as well. Heat Cable in the gutters alone will not manage problematic ice on the roof surface.
Measuring the area of your roof that is affected by ice dams so you know how much heat tape to get is not overly complex, but it does have a few variables. Use our Heat Tape Measuring Guide to understand the process and print a worksheet that you can use to make sure you have all the right numbers.
Once you have all the measurements and considerations you need, use our Heat Tape Calculator to calculate the size of heat tape you should get.
Check out our full list of Frequently Asked Questions on our FAQ Page.
Take a Look at Our Heat Tape Installation Case Studies
Learn a Bit about Ice Dams and How & Why they Form



Find heat tape products & accessories for ice dam prevention and pipe freeze protection.
We may be able to help connect you with a Radiant Solutions Heat Tape installer in your area.
And Product Dimensions
Understand the problems that our products solve and the advantage Radiant Solutions has over our competitors.
Demand is high across the U.S. & installers are needed!
128-Bit encrypted connection
We’re here to help. We are a 35 year old, family-owned, American company who loves to hear from our customers.