
How to Install Heat Tape on Commercial Flat Roofs: Center Drains
Installing heat cable on commercial flat roofs requires specific techniques to effectively prevent ice dam formation around center drains. This comprehensive guide covers the proven methods for installing self-regulating heat cable on EPDM and TPO membrane roofing systems, ensuring proper drainage and ice prevention throughout winter months.
Heat Tape PRO self-regulating cable is explicitly approved for all flat membrane roof systems and will not damage EPDM or TPO surfaces when properly installed. This guide represents the first in our series outlining professional installation techniques for flat roof de-icing systems.
Can You Install Heat Cable on EPDM and TPO Flat Roofs?
Yes, Heat Tape PRO self-regulating cable is specifically designed and UL-listed for use on all flat membrane roof systems, including EPDM (rubber) and TPO (Thermoplastic polyolefin) roofs. According to Radiant Solutions installation documentation, Heat Tape PRO is designed to be used on all roof types, materials and styles, with flat roofs of every material being explicitly approved for heat tape use.
Flat Roof Membrane Compatibility
| Roof Membrane Type | Compatibility with Heat Tape PRO |
| EPDM (Rubber) | Approved & Safe |
| TPO | Approved & Safe |
| PVC | Approved & Safe |
| Other Flat Membranes | Approved & Safe |
The self-regulating technology ensures the cable operates at temperatures between 60°F-85°F in cool environments, making it safe for direct contact with membrane roofing materials without risk of damage.
Heat Cable Installation Methods for Flat Roof Valleys
Two primary methods can be used for installing heat cable in valleys leading to a center drain on a flat roof, each offering specific advantages depending on the severity of ice conditions and roof complexity.
Installation Method Comparison
| Method | Description | When to Use |
| Single Continuous Run | Cable down one side of valley, loop through drain, continue up opposite side | Standard installation, most climates |
| Double (Figure-8) Run | Two parallel runs per side of valley | Severe ice buildup, complex roof features |
Single Continuous Run Installation
A single, continuous heat cable runs from a junction box, down the length of the valley, down into the drain, back up out of the drain, and then continues down the length of the opposite valley before terminating. This method creates a single serpentine path through both sides of the valley.
Key specifications for single run installation:
- Cable extends 42-48 inches into the drain pipe for optimal ice prevention
- Creates one melted pathway from roof edge to drain
- Most cost-effective solution for moderate ice conditions
- Suitable for roofs without complex features or severe ice buildup
Figure-8 Double Loop Installation
A single heat cable is looped to create two parallel runs on each side of the drain. The cable starts at the junction box, runs down the valley, and then loops back up the same valley. It then extends down into the drain, comes back up, and runs down the opposite valley, looping back up that same valley before terminating. This creates a double-melted pathway in each valley.
Advantages of double loop installation:
- Provides wider heated channels on each side of the drain
- Recommended for severe ice buildup conditions
- Ideal for roofs with complex features like equipment that causes snow drifting
- Increases melt capacity in extremely cold or snowy areas
How Many Heat Cable Runs Do You Need?
We are often asked if a low-slope roof with a valley should get one heat cable or two. Generally speaking, one run of Heat Tape PRO will provide adequate de-icing in a valley under typical conditions.
However, a double run (figure-8 method) is advised when:
- The roof experiences very severe ice buildup
- Complex roof features create snow drifting patterns
- The building is located in extremely cold or snowy climates
- Maximum melt capacity is required for critical drainage areas
This approach is analogous to gutter installations, where Radiant Solutions recommends two parallel cable runs for maximum effectiveness in harsh winter conditions.
How Far Should Heat Cable Extend Into Roof Drains?
The cable must be looped down into the drain and back up to keep the drain pipe clear of ice. For drain pipes, the cable should be routed down into the pipe and then looped back out, with proper depth being critical for effectiveness.
Drain Cable Length Recommendations
| Recommendation | Cable Length Inside Drain |
| Installer Guideline (General) | ~24 inches |
| Radiant Solutions Recommended | 42–48 inches |
The deeper Radiant Solutions recommendation ensures:
- Complete ice melting throughout the drain pipe
- Continuous water flow during freeze-thaw cycles
- Prevention of ice blockages that could cause roof ponding
- Adequate heat distribution in the critical drainage area
Best Heat Cable Pattern for Center Roof Drains
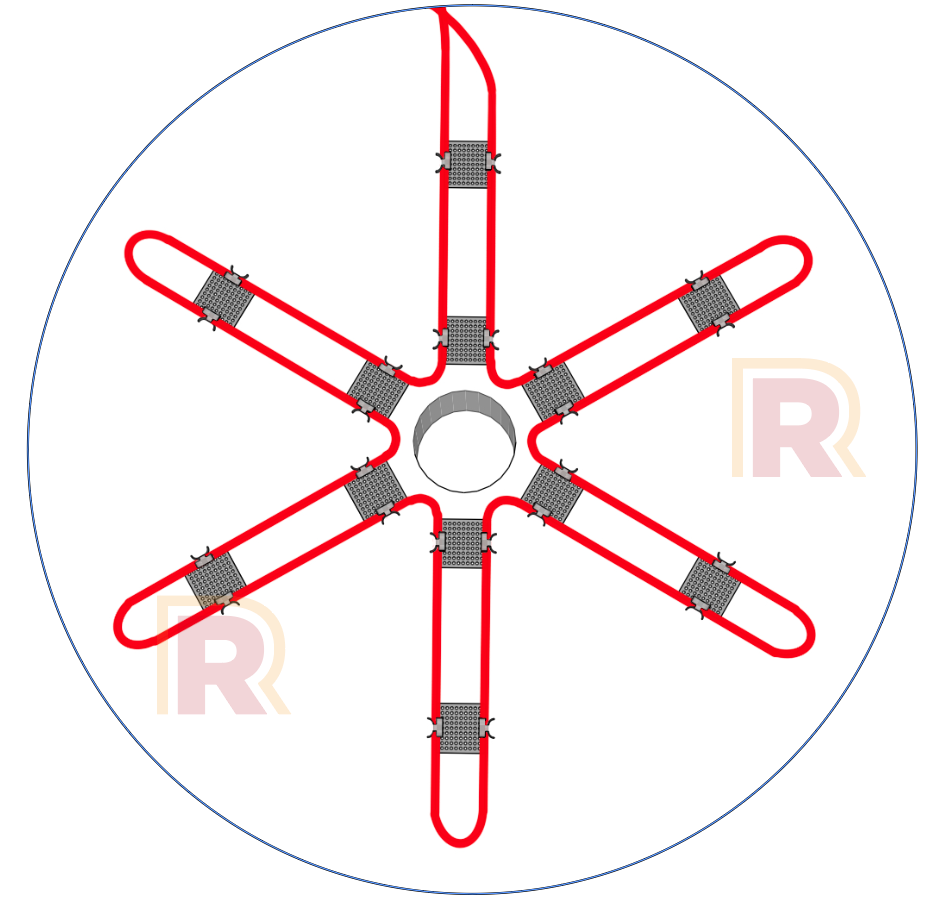
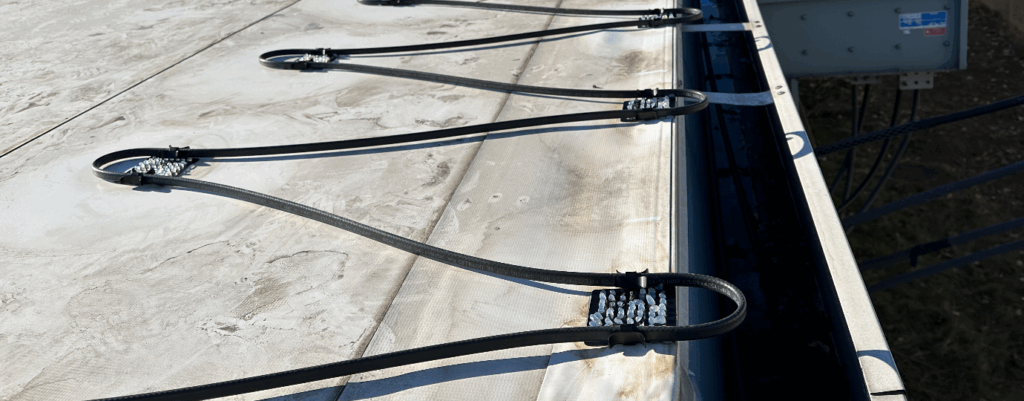
Creating an effective heat cable pattern around center drains maximizes ice prevention and ensures reliable drainage. The optimal approach involves creating a “star” (asterisk) pattern around the drain.
Star Pattern Installation
There are extended aluminum roof drain heat cable kits that allow installers to create a pattern of heat cable that resembles an approximate ‘star’ shape. This involves arranging multiple loops of heat cable extending outwards from the central drain to create several melted pathways.
Star pattern specifications:
- 3-6 cable loops radiating outward from the drain like spokes
- Each loop extends approximately 18 inches from the drain center
- Creates multiple clear paths for melting ice to reach the drain
- Uses large DDK clips to secure the cable in the star configuration
Many of our contractors simply use the DDK Heat Cable Kit to create their own design, saving money and time while achieving professional results.
Required Parts for Flat Roof Heat Cable Installation
| Component | Product Code | Purpose | Notes |
| Hard-wire Connection Kit | HCK-M-1 | Junction box and electrical components | Permanent electrical connection instead of a plug |
| Heat Cable Attachment Kit | DDK-719-2 | Double-cradle oversized clips | Recommended for flat membrane roofs |
| Heat Tape PRO Cable | Various lengths | Self-regulating heat cable | Use a calculator to determine length needed |
| Roof Drain Grate | – | Sturdy drain protection | Protects cable and prevents debris |
| Adhesive Sealant | SB-190 | Industrial roof-bonding sealant | Waterproof clip attachment |
Essential Installation Components
The following products are required for a complete flat roof installation:
- HCK-M-1: A connection kit including a junction box and components for permanent electrical connection
- DDK-719-2: A heat cable attachment kit with heavy-duty adhesive clips designed specifically for membrane roofs
- Drain grate and attachment hardware: Sturdy protection for the cable within the drain system
- Heat Tape PRO cable: Self-regulating heat cable in the appropriate length for your installation
- SB-190 Sealant: A tube of SureBond SB-190 adhesive for waterproof clip mounting
To determine the exact amount of heat cable you need, use our Heat Tape Calculator for precise measurements based on your roof dimensions.
Professional Installation Considerations
Safety and Code Compliance
All electrical connections must comply with local building codes and should be installed by qualified personnel. The HCK-M-1 hard-wire connection kit ensures professional-grade electrical integration with building systems.
Seasonal Maintenance
While Heat Tape PRO systems require minimal maintenance, periodic inspection of:
- Clip attachments and cable positioning
- Drain grates for debris accumulation
- GlowCap™ LED indicators for system operation
- Electrical connections for proper function
System Monitoring
Heat Tape PRO features the exclusive GlowCap™ LED technology, allowing visual confirmation that the system is operating properly. The green LED light at the cable end provides instant verification of system function without requiring additional monitoring equipment.
Why Choose Self-Regulating Heat Cable for Flat Roofs?
Self-regulating technology offers significant advantages over constant wattage alternatives:
- Energy Efficiency: Cable output adjusts automatically based on ambient temperature
- Safety: Cannot overheat, even when overlapped
- Durability: Rated for all roof materials, including EPDM and TPO
- Reliability: 10-year warranty coverage – the best in the industry
- Cost Savings: Reduced energy consumption compared to constant wattage systems
For detailed information about self-regulating vs. constant wattage heat cable, refer to our comprehensive comparison guide.
Get Professional Installation Support
For customers who prefer professional installation, Radiant Solutions maintains a network of qualified installers nationwide. Our Professional Installer Program connects property owners with experienced contractors who specialize in commercial flat roof de-icing systems.
Ready to protect your flat roof from ice damage? Contact our technical support team at 877-387-4218 for personalized guidance on your specific installation requirements, or use our online calculator to begin planning your heat cable system today.