

PipeFreeze Pro is a self-regulating heat cable with an integrated thermostat designed to prevent frozen pipes. This guide addresses the most common PipeFreeze Pro problems and how to solve them.
Quick Summary: Most heat cable issues fall into three categories: 1) power supply problems, 2) cable damage, or 3) inadequate insulation. The green GlowCap LED end cap on the cable provides a visual confirmation the system is working and the built-in thermostat activates automatically when temperatures drop to around 37°F. If you’re experiencing issues, start by checking your power supply and circuit breaker, then verify the cable is warm during freezing temperatures.
Before diving into specific problems, run through this quick checklist:
If the heat cable remains completely cold when it should be warm, consider these main causes:
Power supply issues: The most common reason is lack of power. Check that the cable is firmly plugged in and inspect your breaker/GFCI – it may have tripped and cut power to the outlet. Also test the outlet itself (for example, try another device or use a circuit tester) to ensure it’s delivering power. Without a proper power supply, the cable won’t heat at all.
Thermostat not triggering: Remember that the PipeFreeze Pro thermostat only turns the cable on at low temperatures (around 37°F or below for an extended period). If the surrounding temperature hasn’t dropped low enough, or if the thermostat sensor is located in a spot that isn’t sensing the cold (for instance, if it’s accidentally covered by insulation or in a warmer area), the cable will stay off. Make sure the small thermostat module (the “lump” on the cable between the power cord and the heating cable) is exposed to the air, not insulated. If you suspect the thermostat isn’t activating even though it’s cold out, perform the ice pack test described below to force it on.
Cable damage or water intrusion: A physical break or internal defect in the cable can prevent it from heating. For example, if one of the conductive buss wires inside is severed, the cable will not heat up at all. Similarly, water ingress into the thermostat or electrical connections can cause a short or failure that stops the cable from working (the cable is water-resistant, but the thermostat unit should be kept dry for proper operation). Inspect the entire length of the heat tape for any visible cuts, crush damage, or chewed sections. If the PipeFreeze Pro is plugged in during freezing weather and truly stays cold (and you’ve ruled out power and thermostat issues), it’s likely defective or damaged. The only solution in that case is to replace the cable with a new one to restore freeze protection.
Pipe freeze prevention heat cable should maintain warmth along its entire length when operating. If you discover that only a certain section of the cable is heating and another section is remaining cold, that is a sign of internal damage to the cable at the point where the heat stops. Self-regulating heat cables use parallel bus wires and a conductive core; a break or burnout in one section can interrupt the heating in that area (for instance, a severed bus wire would cut power beyond the break). Unfortunately, you cannot repair just one portion of the cable in a way that reliably restores performance. The only safe and effective solution is to replace the entire heat cable. Continuing to use a partially functioning cable is risky, as the damaged segment means the pipe in that area isn’t protected from freezing. For full coverage, install a new cable (and dispose of the old one) so that every part of the pipe is warmed consistently.
If your pipe froze despite having a heat cable, it’s almost always due to an installation or usage issue preventing the system from doing its job. Common reasons include:
The heat cable wasn’t actually energized: In many cases, the cable may have been unplugged or it was connected to a tripped GFCI outlet. In other words, the cable might not have been heating when the freeze happened. After resolving the power supply issue, double-check that the PipeFreeze Pro is powering on (for example, ensure the GlowCap light turns on and that the cable feels warm). Also verify the thermostat sensor is positioned correctly. It should be exposed to the cold air, not tucked in a warm spot or under insulation so that it can activate at the right time. If the thermostat isolated from the cold the cable will not energize.
Poor or insufficient insulation on the pipe: Pipe freeze prevention heat tape must be used in conjunction with proper pipe insulation. If the pipe’s insulating foam or wrap was missing, thin, damaged, or wet, the heat can quickly dissipate and may not prevent freezing. The entire length of the heated pipe should be completely covered with insulation for the system to work effectively. Make sure there are no gaps or exposed sections of pipe. Use a minimum 1/2″ thickness standard pipe insulation.
Cable not in contact or not covering the full pipe run: The PipeFreeze Pro needs to be installed tight against the pipe surface for proper heat transfer. If the cable is loosely hanging or has gaps where it doesn’t touching the pipe, those spots could freeze. Likewise, if only part of the pipe has heat cable on it, an unprotected section can still freeze. Always run the cable along every section of pipe that is exposed to the cold, especially around bends, valves, or any area prone to freezing. In some cases, a single heat cable might not output enough heat for very large-diameter or extremely exposed pipes. Certain circumstances (like pipes over 1″ diameter, plastic pipes with low thermal conductivity, or extremely cold climates) may require the addition of a second run of heat cable and/or increased insulation to fully safeguard the pipe.
If your heat cable continually trips the circuit breaker (or GFCI), it points to an electrical problem that needs attention. Likely causes are:
Overloaded circuit: Heat tape draws power (several watts per foot, increasing in colder weather) which, when combined with other appliances could overload a circuit. If the heat cable is on a circuit that’s near its limit, the added load can trip the breaker. Exceeding the recommended length of heat cable on one circuit can also cause an overload. Running too much cable (or multiple cables) on a single circuit can result in breaker trips. The solution is to reduce the load: try moving the heat cable to a dedicated circuit, unplug other devices on that line, or if you have a very long run, split it across two circuits.
Short circuit or ground fault (damage-related): A breaker that trips immediately (especially a GFCI that trips) often indicates a short or leakage to ground. Physical damage to the cable is a prime culprit. If an animal chewed through the cable or insulation or if the cable was crushed or cut, the exposed conductors could be touching and creating a fault. Water infiltration into an electrical connection or the thermostat could similarly cause a short or ground fault. Inspect the entire length of the heat tape for any signs of cuts, gnaw marks, or abrasions in the insulation. If you find damage, disconnect power immediately. A damaged heat cable can trip the breaker for safety, and it must be replaced or properly repaired before use. Do not continue resetting the breaker without fixing the underlying issue. Replacing the cable is usually the safest fix for a shorted or compromised heat tape.
Defective breaker or outlet (rare): On occasion, the breaker (or outlet) itself might be at fault. If you’ve ruled out overloads and cable damage, it’s possible the circuit breaker is weak or faulty. Breakers can wear out and start tripping below their rated load. In this rare case, have an electrician evaluate the breaker and the circuit wiring to determine if the breaker needs replacement. However, always eliminate the more common causes above first.
Many people assume a heating cable will feel “hot” to the touch, but this is a misconception. PipeFreeze Pro is designed to operate at a low, self-regulating temperatures. In fact, when wrapped on a pipe under insulation, the cable typically won’t exceed about 60°F surface temperature, which by touch might feel just mildly warm. This gentle warmth is enough to keep water above freezing without risking damage to the pipe or insulation.
So if you check the cable on a cold day and it’s warm (but not hot), that’s exactly how it’s supposed to work.
The only reliable way to test that the built-in thermostat is functioning (especially in warmer weather) is to perform an “ice pack test.” This simulates freezing conditions to force the thermostat on. Follow these steps to test your PipeFreeze Pro:
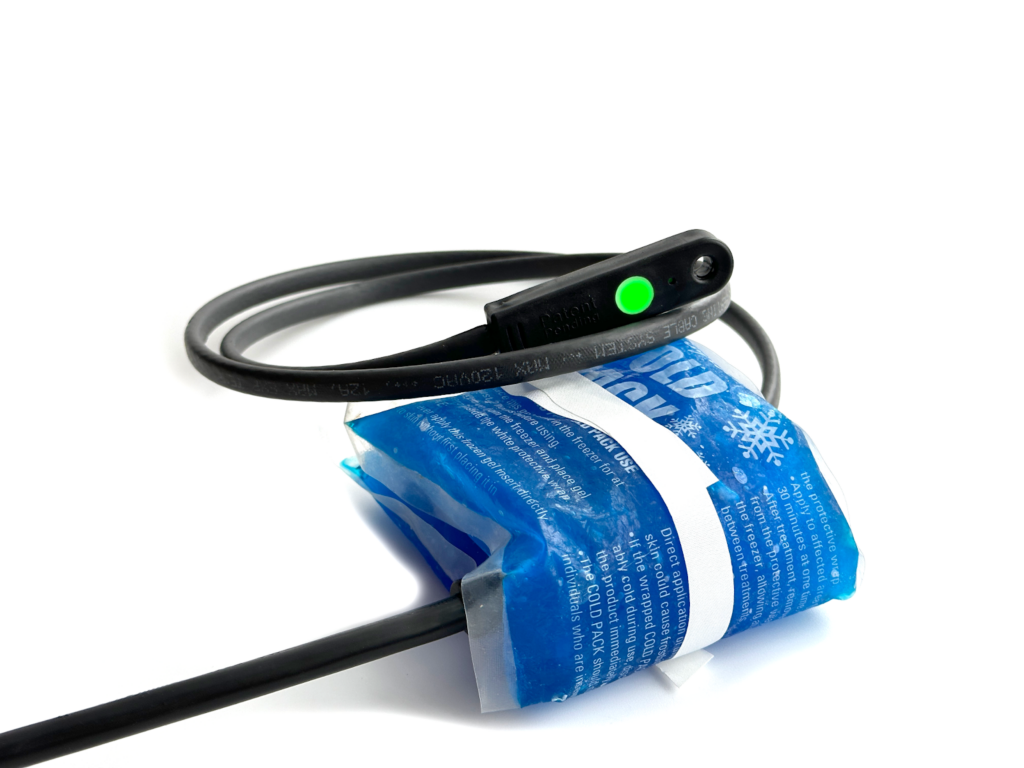
If the green LED “GlowCap” on the PipeFreeze Pro isn’t lit, it usually comes down to two main possibilities:
Thermostat not activated by temperature: The built-in thermostat will only energize the cable (and illuminate the green light) when the ambient temperature drops to roughly 37°F or below for an extended period. In milder conditions above its activation threshold, the cable stays off and the light remains off by design. This is normal and once it gets cold enough (around freezing), the thermostat should trigger and the green light will come on.
No power to the cable: If it is cold enough to trigger the thermostatic switch but the light still stays off, the cable may not be receiving power. The first troubleshooting step is to check the electrical supply to ensure the unit is plugged in and then verify that the outlet or GFCI circuit hasn’t tripped at the breaker panel. A tripped breaker or faulty outlet will prevent the heat cable from energizing (and thus no light).
Pro tip: Use an ice pack to test the thermostat during conditions above 32ºF. See the testing section below for detailed instructions.
No need to worry, if the cable itself feels warm to the touch, that means the system is working correctly even if the green light is off. The GlowCap LED is a convenience feature and a burned-out or defective LED has no effect on the cable’s heating performance.
| Issue | Possible Causes | Solutions |
| Green LED not lighting up | Thermostat not triggered (temps above 37°F) | Monitor cable when temps drop below 32°F for at least one hour; Test thermostat with ice pack |
| No or low power supply voltage | Check for tripped circuit and/or outlet issues | |
| Green LED off but cable warm | Defective LED | No action required – cable is working properly despite indicator failure |
| Entire cable not generating heat | No or low power supply | Check for tripped/damaged circuit breaker and faulty outlet |
| Cable damaged | Test damaged section; Perform insulation resistance test with 1000VDC megometer; Replace cable if needed | |
| Water infiltrated thermostat | Replace cable with Heat Tape Pro for wet locations | |
| Part of cable not heating | Unheated area damaged | Replace entire cable – partial repairs are not reliable |
| Frozen pipe despite heat cable | Cable not energized | Verify power supply, check thermostat positioning |
| Inadequate thermal insulation | Check for damaged/wet insulation – pipe must be 100% covered with minimum 1/2″ insulation | |
| Insufficient cable coverage | Add second line of cable for pipes >1″ diameter or in extreme conditions | |
| Cable not in direct contact | Ensure cable is in direct contact with pipe to transfer heat effectively | |
| Circuit breaker tripping | Circuit overloaded | Remove other devices from circuit; Reduce cable footage; Power up when temps above freezing |
| Short circuit/damaged cable | Inspect entire cable for damage, gnaw marks; Repair or replace; Check for water infiltration | |
| Defective circuit breaker | Replace circuit breaker after ruling out other causes |
Proper installation is everything:
Regular maintenance:
Electrical safety:
If you’ve worked through this troubleshooting guide and still have issues with your PipeFreeze Pro, Radiant Solutions offers world-class support. Our team has decades of real-world experience with freeze prevention systems.